Dienstag, 28. Juli 2009

How to enable/use the new Features of Chameleon 2.0 RC2

I had some problems to find out how to enable and use the new features of Chameleon 2.0 RC2. These options are hidden in the Installer and not enabled by default. Push the Customize button and open Options:


Selecting one of these options will make an entry in the com.apple.Boot.plist file located in the Extra folder. Here is the result if you select all the options.

Extra/com.apple.Boot.plist:

<?xml version="1.0" encoding="UTF-8"?>
<!DOCTYPE plist PUBLIC "-//Apple Computer//DTD PLIST 1.0//EN" "http://www.apple.com/DTDs/PropertyList-1.0.dtd">
<plist version="1.0">
<dict>
<key>Kernel</key>
<string>mach_kernel</string>
<key>Kernel Flags</key>
<string></string>
<key>UHCIreset</key>
<string>y</string>
<key>GUI</key>
<string>n</string>
<key>GraphicsEnabler</key>
<string>y</string>
<key>ForceWake</key>
<string>y</string>
<key>ForceHPET</key>
<string>y</string>
<key>EthernetBuiltIn</key>
<string>y</string>
<key>EHCIacquire</key>
<string>y</string>
</dict>
</plist>


To use the new dynamic configuration features of Chameleon 2.0 RC2 you must delete the device-properties in your com.apple.Boot.plist. The device-properties you had made with EFIStudio.

Update: Unfortunately the new features are not working for me. Chameleon detects my nVidia 7300 GT graphic card and the 2 onboard ethernet chips, but after booting Mac OS X I only have VESA graphic and the ethernet ports are not built-in. Here is a screenshot of the Chameleon debug output:


Maybe I will find some time to dig into the Chameleon source code to fix this bug. I already compiled Chameleon and it worked, so I could start debugging. For the time being I will stay with my "old" Chameleon RC1 com.apple.Boot.plist:
<?xml version="1.0" encoding="UTF-8"?>
<!DOCTYPE plist PUBLIC "-//Apple//DTD PLIST 1.0//EN" "http://www.apple.com/DTDs/PropertyList-1.0.dtd">
<plist version="1.0">
<dict>
<key>Kernel</key>
<string>mach_kernel</string>
<key>Kernel Flags</key>
<string></string>
<key>Default Partition</key>
<string>hd(1,2)</string>
<key>Legacy Logo</key>
<string>Yes</string>
<key>Timeout</key>
<string>3</string>
<key>device-properties</key>
<string>ea02000001000000030000003f0000000100000002010c00d041030a0100000001010600041c0101060000007fff0400160000006200750069006c0074002d0069006e0000000500000001600200000d00000002010c00d041030a010000000101060000010101060000007fff04000e0000004e00560050004d0000002000000001000000000000000000000000000000000000000000000000000000220000005600520041004d002c0074006f00740061006c00730069007a006500000008000000000000101c0000006400650076006900630065005f00740079007000650000000f0000004e5644412c506172656e740e0000006e0061006d00650000000b000000646973706c617922000000400030002c006400650076006900630065005f00740079007000650000000b000000646973706c617922000000400031002c006400650076006900630065005f00740079007000650000000b000000646973706c6179100000006d006f00640065006c0000001a0000006e5669646961204765466f726365203733303020475420000000400031002c0063006f006d00700061007400690062006c00650000000e0000004e5644412c4e564d616314000000400030002c006e0061006d0065000000120000004e5644412c446973706c61792d4114000000400031002c006e0061006d0065000000120000004e5644412c446973706c61792d4220000000400030002c0063006f006d00700061007400690062006c00650000000e0000004e5644412c4e564d6163100000004e00560043004100500000001800000004000000000003000c00000000000007000000001e00000072006f006d002d007200650076006900730069006f006e0000002e0000006e5669646961204765466f7263652037333030204754204f70656e474c20456e67696e65205b4546495d3f0000000100000002010c00d041030a0100000001010600051c0101060000007fff0400160000006200750069006c0074002d0069006e0000000500000001</string>
</dict>
</plist>

Update 2: The autodetection is working, but this new Chameleon feature needs teh value UID=0 for the PCI-root-device PCI0. Unfortunately all Gigabyte mainboards I has seen so far are using the value UID=1. This can be fixed by patching the DSDT (change is marked green):
Scope (\_SB)
{
Device (PWRB)
{
Name (_HID, EisaId ("PNP0C0C"))
Method (_STA, 0, NotSerialized)
{
Return (0x0B)
}
}

Device (PCI0)
{
Name (_HID, EisaId ("PNP0A03"))
Name (_ADR, 0x00)
Name (_UID, 0x00)
Name (_BBN, 0x00)
Method (_S3D, 0, NotSerialized)

Chameleon 2.0 RC2 is out

Exiting news! Chameleon 2.0 RC2 is released. Build number is 640. This new version has many bug fixes and also some really cool features. These features are:
  • dynamic nVidia Graphic Card detection
  • setting the "built-in" flag for onboard ethernet (TimeMache Fix)
  • hiding of non-bootable HFS partitions
  • automatic RAID booting
You can download the Installer Package, the binaries and even the source code on the Chameleon Project Homepage.

Mittwoch, 22. Juli 2009

EFI-X™ Module Autopsy

After I got my EFI-X™ back, I thought to sell it in eBay. I don't need it anymore. The Chameleon solution works better and I have the choice and the possibility to fix all issues by myself.

I was so curious about what's inside this "holy" EFI-X™ module, that I decided to open it. OK, I will loose some money, but my curiosity was greater :-)))

Open the module was not that difficult as I thought. Got this done without any visible trace on the enclosing. The front and the backside of the PCB was potted with some black plastic sealing. But I could remove the "protection" quite easy with a chemical treatment.

Here are the Photos. For the time being only in low resolution.

EFI-X™ Frontside still with protection:


EFI-X™ Backside still with protection:


EFI-X™ Frontside disassembled:


EFI-X™ Backside disassembled:


Very first analysis: The EFI-X™ module is made of nothing special at all. The module uses only one USB-port. The second USB-port of the mainboard connector is unused and not connected (See the backside photos). There are a microcontroller (64pin TQFP package, maybe it's a CPLD/FPGA), a 8 MHz ceramic resonator, a 5V to 3.3V DC-DC converter and a flash memory (presumably 256MB). The PCB seems to be a 4 layer. The whole thing, inclusive PCB, case, cable and packaging should be cost less than 10 dollars, I guess.

As you can see, ASEM had removed the description/partnumber of the microcontroller and the flash memory with a Laser. I will find out to which pins the oscillator and the USB is connected. This is like a fingerprint to discover which microcontroller they are using.

Update: New infos and better photos here.

Montag, 20. Juli 2009

21.) USB "Device Removal" problem [Update]

The modified IOUSBFamily-343.4.4.kext from the InsanelyMac Forum did not work for me. It solved the "Device Removal" problem upon wakeup from sleep, but my USB-Soundsystem does not work with this patched IOUSBFamily and there are some other issues.

So I began to study the relevant code in detail. This is the function from IOUSBFamily.kext, which marks the EHCI controller as "external" aka "Card Type=PCI":
void
AppleUSBEHCI::CheckSleepCapability(void)
{
_controllerCanSleep = true;
_hasPCIPwrMgmt = false;
_onCardBus = (0 != _device->metaCast("IOCardBusDevice"));
if ( !_device->getProperty("AAPL,clock-id") &&
!((getPlatform()->getChipSetType() == kChipSetTypeGossamer) &&
getPlatform()->getMachineType() == kGossamerTypeYosemite) )
{
if (_device->getProperty("built-in")) {

if (_device->hasPCIPowerManagement(kPCIPMCPMESupportFromD3Cold)) {
_device->setProperty(kIOPCIPMEOptionsKey, kOSBooleanTrue);
if (_device->enablePCIPowerManagement(kPCIPMCSPowerStateD3) == kIOReturnSuccess) {
_hasPCIPwrMgmt = true;
setProperty("Card Type","Built-in");
}
}
} else {
if (_device->hasPCIPowerManagement()) {
_device->setProperty(kIOPCIPMEOptionsKey, kOSBooleanTrue);
if (_device->enablePCIPowerManagement() == kIOReturnSuccess) {
_hasPCIPwrMgmt = true;
setProperty("Card Type","Built-in");
}
}
}
if (!_hasPCIPwrMgmt) {
USBError(1, "AppleUSBOHCI[%p]::CheckSleepCapability - controller will be unloaded across sleep",this);
_controllerCanSleep = false;
setProperty("Card Type","PCI");
}

} else {
setProperty("Card Type","Built-in");
}
if ( _onCardBus ) {
setProperty("Card Type","CardBus");
USBLog(1, "AppleUSBEHCI[%p]::CheckSleepCapability - i CANNOT sleep(CardBus)", this);
_controllerCanSleep = false;
}
_ExpressCardPort = ExpressCardPort(_device);
_badExpressCardAttached = false;
}

IOPCIDevice::hasPCIPowerManagement() from IOPCIFamily.kext returns false and this is actually the problem. Why it does return false? It's a bug in IOPCIFamily.kext or it's the EHCI pci device itself? To figure that out I used lspci to dump the powermanagement capabilities of the EHCI controller in the ICH10 southbride. Here is the output of lspci for the two EHCI controller:
00:1d.7 USB Controller: Intel Corporation 82801JI (ICH10 Family) USB2 EHCI Controller #1
Subsystem: Giga-byte Technology GA-EP45-DS5 Motherboard
Region 0: Memory at e9304000 (32-bit, non-prefetchable) [size=1K]
Capabilities: [50] Power Management version 2
Flags: PMEClk- DSI- D1- D2- AuxCurrent=0mA PME(D0-,D1-,D2-,D3hot-,D3cold-)
Status: D0 PME-Enable- DSel=0 DScale=0 PME+

00:1a.7 USB Controller: Intel Corporation 82801JI (ICH10 Family) USB2 EHCI Controller #2
Subsystem: Giga-byte Technology GA-EP45-DS5 Motherboard
Region 0: Memory at e9305000 (32-bit, non-prefetchable) [size=1K]
Capabilities: [50] Power Management version 2
Flags: PMEClk- DSI- D1- D2- AuxCurrent=0mA PME(D0-,D1-,D2-,D3hot-,D3cold-)
Status: D0 PME-Enable- DSel=0 DScale=0 PME-

The EHCI controllers of the Gigabyte GA-EP45-DS3 mainboard are not advertising any PM capabilities:
  1. PME: D0=off
  2. PME: D1=off
  3. PME: D2=off
  4. PME: D3cold=off
  5. PME: D3hot=off
Therefore the EHCI controller are seen as external. I still don't know whether this is a problem of all ICH10 southbridges or only a typical problem of some Gigabyte mainboards. This is to output of lspci from my MacBook Pro 13. As you can see, the MacBook does advertise all PM capabilities:
00:04.1 USB Controller: nVidia Corporation Unknown device 0aa6 (rev b1)
Subsystem: nVidia Corporation Unknown device cb79
Region 0: Memory at 93489200 (32-bit, non-prefetchable)
Capabilities: [80] Power Management version 2
Flags: PMEClk- DSI- D1+ D2+ AuxCurrent=0mA PME(D0+,D1+,D2+,D3hot+,D3cold+)
Status: D0 PME-Enable- DSel=0 DScale=0 PME-
This is the lspci output from an ASUS mainboard I've found in the Internet. It has also an ICH10 southbrigde, but with advertised PM capabilities. So the problem of the missing PM capabilities is not related to the ICH10 southbrigde:
00:1a.7 USB Controller: Intel Corporation ICH10 USB2 EHCI Controller #2
Subsystem: ASUSTeK Computer Inc. Unknown device 82d4
Region 0: Memory at fe7ffc00 (32-bit, non-prefetchable) [size=1K]
Capabilities: [50] Power Management version 2
Flags: PMEClk- DSI- D1- D2- AuxCurrent=375mA PME(D0+,D1-,D2-,D3hot+,D3cold+)
Status: D0 PME-Enable- DSel=0 DScale=0 PME-


Update: There is a solution for this annoying bug. You can fix it by patching the EHCI devices in the DSDT. Gigabyte uses the names USBE and USE2 for EHCI devices. Here is the patch. You must at the green part:
Device (USBE)
{
Name (_ADR, 0x001D0007)
Method (_S3D, 0, NotSerialized)
{
If (LEqual (OSFL, 0x02))
{
Return (0x02)
}
Return (0x03)
}

Name (_PRW, Package (0x02)
{
0x0D,
0x03
})

Method (_DSM, 4, NotSerialized)
{
Store (Package (0x04)
{
"AAPL,clock-id",
Buffer (One)
{
One
},
"device-type",
Buffer (0x05)
{
"EHCI"
}
}, Local0)
DTGP (Arg0, Arg1, Arg2, Arg3, RefOf (Local0))
Return (Local0)
}

}

New Blog Layout

Do you like the new Layout of my Blog? I made the content area much wider, improved the style for preformatted text and started using Tags. Now the content area is over 700px wide and all the Terminal stuff is much better to read. A great help to dig into CSS was Safari. Safari has a nifty feature called Inspector. Make a right-click on an element of a website and choose Inspect Element. Safari will come up with this cool interactive Tool:


Donnerstag, 16. Juli 2009

20.) ACPI DSDT Table (Differentiated System Description Table)

I started diving into all this wired ACPI / DSDT stuff. The ACPI-Spec has more than 700 pages! Part of the ACPI is the DSDT. DSDT is an acronym for Differentiated System Description Table. This table contains the Differentiated Definition Block, which supplies the information and configuration information about the base system. Here are some useful link to start reading:
  1. ACPI - Advanced Configuration and Power Interface
  2. Linux/ACPI - DSDT: Overview
  3. HOWTO: Fix Common ACPI Problems (DSDT, ECDT, etc.)
  4. ACPI Downloads (eg. iASL Compiler/Disassembler, Source)
  5. DSDT Patcher - InsanelyMac Forum (contains Mac OS X iASL binary)
Each mainboard, even different BIOS version, has it's own DSDT. All Information I'm giving you here in this Blog is specific to the Gigabyte GA-EP45-DS3 mainboard with BIOS version F9. Your DSDT might look very similar and the patches/fixes/solutions should be done in a similar way, but I cannot guarantee this.

I managed to get, disassemble, compile the DSDT. I had to fix some errors in the DSDT, which is very common if you use the Intel iASL Compiler. Seems that the Microsoft Compiler is not so piggy and almost all mainboard makers using the Microsoft Compiler for their ACPI stuff. After this very first steps I started to modify the DSDT. I modified the RTC and the HPET section to make AppleRTC.kext and AppleIntelCPUPowerManagement.kext work. After that I could delete Disabler.kext from the Extra/Extensions folder of the Chameleon USB-stick. Great, isn't it!

To start working with DSDT you need the DSDT of your mainboard and an ASL Compiler/Disassembler like the iASL. You can download the tools from the InsanelyMac forum or here. These are tools for Mac OS X. Windows and Linux versions are also available in the net.

How to obtain the DSDT. Under Mac OS X run the script getDSDT.sh in the Terminal:
admin@MacBook [~/Downloads/Tools] > ls -la
total 1160
drwxr-xr-x@ 4 admin staff 136 Jul 16 18:20 .
drwx------+ 38 admin staff 1292 Jul 16 18:20 ..
-rwxr-xr-x@ 1 admin staff 252 Nov 2 2008 getDSDT.sh
-rwxr-xr-x@ 1 admin staff 587968 Oct 25 2008 iasl
admin@MacBook [~/Downloads/Tools] > ./getDSDT.sh
admin@MacBook [~/Downloads/Tools] > ls -la
total 1208
drwxr-xr-x@ 5 admin staff 170 Jul 16 18:20 .
drwx------+ 38 admin staff 1292 Jul 16 18:20 ..
-rw-r--r-- 1 admin staff 23454 Jul 16 18:20 dsdt.dat
-rwxr-xr-x@ 1 admin staff 252 Nov 2 2008 getDSDT.sh
-rwxr-xr-x@ 1 admin staff 587968 Oct 25 2008 iasl
It gives you the file dsdt.dat, which is the compiled DSDT. Under Linux it's even much easier. Issue "cat /proc/acpi/dsdt > dsdt.aml" and you have the compiled DSDT. Don't get the DSDT under an EFI-X™ controlled Mac, because it might be already modified/patched in some way. Use a Linux Live-CD (Ubuntu) or Chameleon without a DSDT in the Extra folder. Now disassemble the compiled DSDT:
admin@MacBook [~/Downloads/Tools] > ./iasl -d dsdt.dat

Intel ACPI Component Architecture
AML Disassembler version 20080926 [Oct 4 2008]
Copyright (C) 2000 - 2008 Intel Corporation
Supports ACPI Specification Revision 3.0a

Loading Acpi table from file dsdt.dat
Acpi table [DSDT] successfully installed and loaded
Pass 1 parse of [DSDT]
Pass 2 parse of [DSDT]
Parsing Deferred Opcodes (Methods/Buffers/Packages/Regions)
...............................
Parsing completed
Disassembly completed, written to "dsdt.dsl"
Now you can open the file "dsdt.dsl" with your favorite editor, but take care to save it as plain text. But first I will check whether I can compile the original DSDT without errors and warnings:
admin@MacBook [~/Downloads/Tools] > ./iasl -ta dsdt.dsl

Intel ACPI Component Architecture
ASL Optimizing Compiler version 20080926 [Oct 4 2008]
Copyright (C) 2000 - 2008 Intel Corporation
Supports ACPI Specification Revision 3.0a

dsdt.dsl 222: Method (\_WAK, 1, NotSerialized)
Warning 1080 - ^ Reserved method must return a value (_WAK)

dsdt.dsl 285: Store (Local0, Local0)
Error 4050 - ^ Method local variable is not initialized (Local0)

dsdt.dsl 290: Store (Local0, Local0)
Error 4050 - ^ Method local variable is not initialized (Local0)

ASL Input: dsdt.dsl - 5683 lines, 189412 bytes, 2339 keywords
Compilation complete. 2 Errors, 1 Warnings, 0 Remarks, 661 Optimizations
As you can see I got 2 errors and 1 warning. The original Gigabyte DSDT is buggy. The error 4050 can be fixed very easy. Actually Store(Local0, Local0) means nothing but a NOP. It stores the content of the local variable Local0 into Local0. The problem is, that Local0 is not initialized. Change it to for instance Store ("Local0", Local0) or Store(Zero, Local0). The warning 1080 comes out because the _WAK method must return a value. ACPI-spec 7.3.7 defines a return of a package with 2 integers. So inserting Return (Package (0x02) {Zero, Zero}) will fix the warning. Returning Zero is not critical, even Apple returns Zero in their DSDTs. All fixes are colored green
Method (_WAK, 1, NotSerialized)
{
...

If (OSFL)
{
Notify (\_SB.PWRB, 0x02)
}
Else
{
If (LEqual (RTCW, Zero))
{
Notify (\_SB.PWRB, 0x02)
}
}

Notify (\_SB.PCI0.USB0, Zero)
Notify (\_SB.PCI0.USB1, Zero)
Notify (\_SB.PCI0.USB2, Zero)
Notify (\_SB.PCI0.USB3, Zero)
Notify (\_SB.PCI0.USB4, Zero)
Notify (\_SB.PCI0.USB5, Zero)
Return (Package (0x02)
{
Zero,
Zero
})

}

Scope (_SI)
{
Method (_MSG, 1, NotSerialized)
{
Store (Zero, Local0)
}

Method (_SST, 1, NotSerialized)
{
Store (Zero, Local0)
}
}

Now lets compile the fixed DSDT:
admin@MacBook [~/Downloads/Tools] > ./iasl -ta dsdt.dsl

Intel ACPI Component Architecture
ASL Optimizing Compiler version 20080926 [Oct 4 2008]
Copyright (C) 2000 - 2008 Intel Corporation
Supports ACPI Specification Revision 3.0a

ASL Input: dsdt.dsl - 5686 lines, 188406 bytes, 2340 keywords
AML Output: dsdt.aml - 18151 bytes, 661 named objects, 1679 executable opcodes

Compilation complete. 0 Errors, 0 Warnings, 0 Remarks, 31 Optimizations

No warnings, no errors. Fine! You can download the fixed DSDT for my Gigabyte GA-EP45-DS3 mainboard here. To get AppleIntelCPUPowerManagement.kext and AppleRTC working, the devices HPET, RTC and TMR must be modified. The device order in my DSDT is TMR, HPET and RTC.

For the TMR device patch the method _CRS to return ATT6 (ResourceTemplate without IRQNoFlags:
Device (TMR)
{
Name (_HID, EisaId ("PNP0100"))
Name (ATT5, ResourceTemplate ()
{
IO (Decode16,
0x0040, // Range Minimum
0x0040, // Range Maximum
0x00, // Alignment
0x04, // Length
)
IRQNoFlags ()
{0}
})
Name (ATT6, ResourceTemplate ()
{
IO (Decode16,
0x0040, // Range Minimum
0x0040, // Range Maximum
0x00, // Alignment
0x04, // Length
)
})
Method (_CRS, 0, NotSerialized)
{
Return (ATT6)
}
}
For the HPET device patch method _CRS to return ATT3 (ResourceTemplate with IRQNoFlags) and method _STA to return 0x0f:
Device (HPET)
{
Name (_HID, EisaId ("PNP0103"))
Name (ATT3, ResourceTemplate ()
{
IRQNoFlags ()
{0}
IRQNoFlags ()
{8}
Memory32Fixed (ReadWrite,
0xFED00000, // Address Base
0x00000400, // Address Length
)
})
Name (ATT4, ResourceTemplate ()
{
})
Method (_STA, 0, NotSerialized)
{
Return (0x0F)
}

Method (_CRS, 0, NotSerialized)
{
Return (ATT3)
}
}
For the RTC device patch method _CRS to return ATT1 (ResourceTemplate without IRQNoFlags):
Device (RTC)
{
Name (_HID, EisaId ("PNP0B00"))
Name (ATT0, ResourceTemplate ()
{
IO (Decode16,
0x0070, // Range Minimum
0x0070, // Range Maximum
0x00, // Alignment
0x04, // Length
)
IRQNoFlags ()
{8}
})
Name (ATT1, ResourceTemplate ()
{
IO (Decode16,
0x0070, // Range Minimum
0x0070, // Range Maximum
0x00, // Alignment
0x04, // Length
)
})
Method (_CRS, 0, NotSerialized)
{
Return (ATT1)
}
}
Save and then compile it:
admin@MacBook [~/Downloads/Tools] > ./iasl -ta dsdt.dsl

Intel ACPI Component Architecture
ASL Optimizing Compiler version 20080926 [Oct 4 2008]
Copyright (C) 2000 - 2008 Intel Corporation
Supports ACPI Specification Revision 3.0a

ASL Input: dsdt.dsl - 5631 lines, 186571 bytes, 2312 keywords
AML Output: dsdt.aml - 18040 bytes, 661 named objects, 1651 executable opcodes

Compilation complete. 0 Errors, 0 Warnings, 0 Remarks, 31 Optimizations
Put the resulting compiled DSDT "dsdt.aml" in the Extra folder of the Chameleon USB-stick. You are now safe to remove Disabler.kext from the Extra/Extensions folder. Don't forget to rebuild Extensions.mkext. Download the final DSDT here.

Montag, 13. Juli 2009

19.) USB "Device Removal" problem upon wakeup from sleep

Another switcher discovered a problem with USB devices connected to the EHCI bus (aka USB2.0). Upon wakeup from sleep Mac OS X will display a "Device Removal" warning dialog if a USB device has been attached, for instance the Chameleon USB-stick. This is a real problem and can even destroy the filesystem on the device.

This bug exists at least for motherboards with the ICH10R southbridge as my Gigabyte GA-EP45-DS3 (F9). The Apple USB driver sees the onboard USB-ports as external (PCI-Card) and not as built-in and thus applies the wrong powermanagement capabilities. On sleep/wakeup the USB driver issues a "power off"/"power on" to the external ports, instead of suspend/resume as it should for internal ports. You can check whether your ports are internal or external in System Profiler or IORegistryExplorer.

External in System Profiler:

External in IORegistryExplorer:


There already exists a solution. A patched IOUSBFamily.kext kernel extension. Download a already compiled IOUSBFamily-343.4.4.kext or compile it by yourself using the source from the InsanelyMac Forum thread. Put this kext into your Chameleon Extra/Extensions folder, set permissions and ownership and rebuild the Extensions.mkext. After a reboot the EHCI USB ports are shown as internal.

Internal in System Profiler:

Internal in IORegistryExplorer:


You will find the interessting part of the patch in AppleUSBEHCI/Classes/AppleUSBEHCI_PwrMgmt.cpp. As you can see the port will be forced as internal with normal sleep capabilities, but this could break external PCI-USB Cards.
if (!_hasPCIPwrMgmt) {
// USBError(1, "AppleUSBEHCI[%p]::CheckSleepCapability - controller will be unloaded across sleep",this);
// _controllerCanSleep = false;
// setProperty("Card Type","PCI");
_controllerCanSleep = true;
setProperty("Card Type","Built-in");
}

The best solution is clearly to patch the DSDT. But this is still real magic for me and I have to dive into the DSDT stuff first to learn about it.

Sonntag, 12. Juli 2009

18.) About This Mac

I have a Intel® Q6600 CPU. This CPU is not known by Mac OS X. In the "About This Mac" panel a unknown cpu is shown. If you find this annoying you can change this easily by editing one file. It's only a cosmetic issue and absolutely not necessary. Edit the file /System/Library/CoreServices/Resources/English.lproj/AppleSystemInfo.strings as root (use sudo) and replace the "Unknown" for "UnknownCPUKind" with the string you wanna have displayed in the About panel. You must do that for each language you are using (English.lproj). If you don't know which CPU you are using type the following in terminal:
> sysctl -n machdep.cpu.brand_string
You can find more information in this thread: About this Mac - InsanelyMac Forum

I changed "UnknownCPUKind" = "Unknown" to "UnknownCPUKind" = "Intel Core 2 Quad Q6600" and know I have this "About This Mac" panel:

Mittwoch, 8. Juli 2009

17.) System Management BIOS

My Chameleon-EFI Mac already works perfectly for me, but there are still some cosmetic issues, like the Serialnumber or the information about the installed memory. This can be adjusted with a file called smbios.plist in the Extra folder of the Chameleon USB-stick. The values in this property-list defines the hardware on which Mac OS X is running. You will find more information about the SMBIOS in Wikipedia here. Mine smbios.plist looks like this:


The values "SMexternalclock" and "SMmaximalclock" will be set by Chameleon automatically with the real values. As I know these values are the only important ones, but thanks to Chameleon you don't have to care about it. I selected a Mac Pro for the values in smbios.plist because this Mac is very close to my PC.


Montag, 6. Juli 2009

Time Machine

I will give you now some info the problem with non working Time Machine.

Time Machine is a very user friendly and easy to use Backup solution from Apple. The backup it takes, is connected to Computer which made the backup. You cannot use a TM-backup from Computer "A" to restore something on Computer "B". To identify the Computer TM uses the Ethernet-MAC-address of the built-in Ethernet. Every MAC-address is globally unique and every MAC from Apple has ethernet, so it can be used to identify a computer, if the ethernet port is built-in. An exchangeable PCI-card, like the Netgear GA311, does not help, because the card can be removed (loosed MAC-address) or changed (another, different MAC-address). So TM only works if it can find an internal, built-in ethernet port.

This was exactly the I got from TM. It couldn't find any built-in ethernet port, although the two Realtek 8111C are onboard and hence built-in. For some reason Mac OS X does not detect the as built-in. I don't known how Apple detects their own ethernet as built-in.

I flagged the first onboard ethernet port as built-in using device-properties in the Chameleon com.apple.Boot.plist. I made this device-property with EFIStudio. See here.

16.) [10.5] Reboot and DONE!

Now it's time for the last reboot. After the reboot all should work fine. Full resolution graphic with CI/QE, fullspeed ethernet network, Time Machine and Bonjour. As you can see in the first foto, my Chameleon-EFI Mac could see my MacBook Pro via Bonjour. Gigabit ethernet to/from my Linux-NAS work as expected with speeds around 60-80 MByte/sec.


15.) [10.5] Network Services/Ports

To have a clean network installation you should clear all network preferences. Open Preferences -> Network. Delete all Network Services/Ports (with the Minus "-" sign). And then delete the following preferences files:
/Library/Preferences/SystemConfiguration/NetworkInterfaces.plist
/Library/Preferences/SystemConfiguration/com.apple.network.identification.plist
/Library/Preferences/SystemConfiguration/preferences.plist

and if you have

/Library/Preferences/SystemConfiguration/com.apple.airport.preferences.plist
To explain why this could be necessary for you I will tell you my case. I installed the Mac OS X which I'm using with my Chameleon-EFI Mac on my MacBook Pro (external USB-drive). The MacBook Pro has 1 Ethernet, 1 WLAN, 1 Bluetooth and 1 Firewire Network Service/Port. My Chameleon-EFI Mac has 2 Ethernet and 1 Firewire Network Service/Port. After the first boot it showed in Preferences->Network: 1 Ethernet, 1 Airport, 1 Bluetooth (all from my MacBook Pro) and 2 new Ethernet ports en2 and en3. I wanted to have the 2 Chameleon-EFI Mac ethernet ports as en0 and en1. To do so I must delete all the old stuff from the MacBook Pro.

14.) [10.5] Energy Saver Settings

Enable both Checkboxes "Allow power button to sleep the computer" and "Restart automatically after a power failure" in Preferences -> Energy Saver as show in the foto. This will make Shutdown/Sleep/Wakeup working correctly.

Samstag, 4. Juli 2009

13.) [10.5] com.apple.Boot.plist

To have a full resolution graphic card with working CI/QE (Core Image/Quartz Extreme) and a working Time Machine you must provide the Mac OS X onboard drivers with some info about your hardware. This is done by Chameleon and the com.apple.Boot.plist file in the Extra folder of your USB-Stick. Chameleon will inject the device properties which you already have created with EFIStudio into the Mac OS X kernel. The advantage of this approach is, that you don't have to modify your Mac OS X Installation. It remains plain vanilla and this is important for Software updates through Apple's Software Update Application.

You can find the original Mac OS X com.apple.Boot.plist under:
/Library/Preferences/SystemConfiguration/com.apple.Boot.plist

It's almost empty. Use it as a template for your new Chameleon com.apple.Boot.plist. It looks like this:


Copy it to your Desktop. Be careful to NOT move it! Copy it (hold the ALT key while drag-n-drop). Open the copy from the Desktop with your favorite Editor. You must at least add the device properties from EFIStudio. Mine has 2 additional parameters: Default Partition and Timeout. These two are for Chameleon to automatically boot from the right Disk/Partition. Chameleon counts disk starting from 0 and counts partitions starting from 1. Adjust hd(x,y) and the timeout value. Propertylist are XML and have Key-Value pairs. For instance to adjust the Chameleon Bootscreen timeout value find the Key Timeout and change (in the next line) the value (mine is 10). OK the most important things are the device properties. Add the key device-properties and in the next line between "string" and "/string" your device properties in HEX in only ONE line. Mine appears wrapped, but this is due to my editor. If you are done the com.apple.Boot.plist should look like this (but with different values):


Save it in plain text mode (apply Shift-Cmd-T in Textedit) and copy it as com.apple.Boot.plist into the Extra folder of your Chameleon-USB-Stick.

12.) [10.5] First Boot into Mac OS X

Now it's time for the first boot into Mac OS X. Put in your Chameleon USB-Stick an power on the PC. The Chameleon bootloader should welcome you with a similar Welcome screen:


Select the Disk with your Mac OS X Installtion (cursor keys) and hit ENTER. If you hit Cursor down Chameleon will present you a Menu to boot, for instance, in verbose mode.

If all went fine you will see your Mac OS X Desktop or Login Window. It will come up in one Vesa Graphic Mode. Mine came up in 1024x768 (no CI/QE). Login, unzip EFIStudio.zip to (for instance) your Desktop and start it.

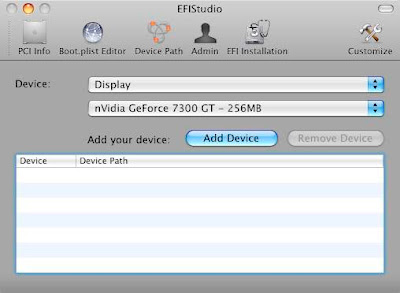
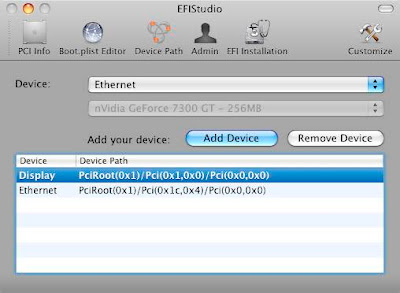
Select Display and your Graphic Card from the list. Mine is a nVidia 7300 GT passiv with 256MB RAM. And click "Add Device"


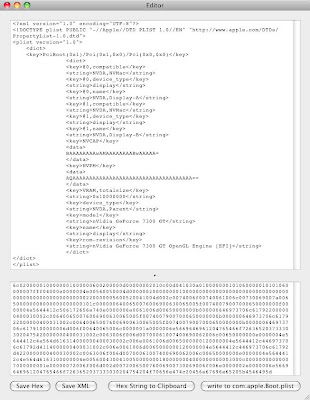
EFIStudio will open this window with all the details of your Graphic card:


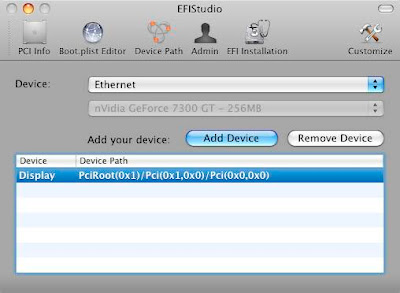
You can close the window. Go ahead an select "Ethernet" and "Add Device". Note the device in the list is your graphic card:


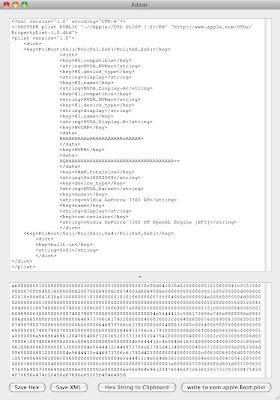
EFIStudio will open this window with all the details of your Graphic card and with one property for your ethernet:


The onboard ethernet will get the property "built-in" and this will make Time Machine happy. I going to explain this later in detail. Now you must save the device properties created by EFIStudio. At least click on "Save Hex" and save it to the Desktop. You must put this device properties in Hexmode in a special file called com.apple.Boot.plist. If you have saved the Hexdata you can close the window. EFIStudio lists now 2 devices, the graphic card and the ethernet controller with their device path. You can close EFIStudio now.

11.) [10.5] BIOS Settings

Because BIOS Settings are somewhat critical I'm posting mine. Take care off correct DRAM Voltage. I had an quiet instable system in the beginning. My SDRAM runs at 1066 Mhz (533Mhz x2) and my OCZ modules needs 2,2 V at that speed.

Other important settings:
  1. Hard Disk Boot Priority - The USB-Stick must be the first
  2. First Boot Device - USB-HDD or Hardisk
  3. SATA AHCI Mode - AHCI
  4. Green LAN - disabled
  5. HPET Support - enabled (I'm using 64 Bit)


New Info about Partitioning

Because my new USB-Stick has 2 GB, a lot more than I need for Chameleon, I decided to make a small EFI-Partition and a bigger partition to for general data exchange. For this reason it's better to have a "Master Boot Record" partition scheme. Good news. Chameleon works also perfectly with a MBR. The EFI-Partition has only a size of 256MB. It's formatted in HFS+ (Journaled). The general data partition "USB" has 1,63 GB. It's formatted in FAT32 for easier use.

I'm back :-)

Had a lot of work this week and no time to continue this little tutorial, but I will continue it tomorrow.

Today went to a local computer dealer and bought this real small USB-Sticks. It's a Transcend JetFlash T3. These sticks are absolutely thin and small. I bought two, to have always a backup.