Dienstag, 10. November 2009

Mac OS X 10.6.2 is out

Tonight Apple has released the next update Mac OS X 10.6.2. I have it already up and running.

Attention: Do not update if you have SleepEnabler.kext in the Chameleon Extra folder. It will result in a Kernel Panic!!! For more info about this issue read this post in the Netkas Blog. Remove SleepEnabler.kext or replace it with the newer version made by Netkas before updating to Mac OS X 10.6.2.

Dienstag, 13. Oktober 2009

9.) [10.6] Final Touch

If you have your Mac OS X up and running, then it's time for the final touch. Get rid of the verbose booting messages, configure Chameleon to automatically boot your fresh installed Mac OS X 10.6 and displaying the gray Apple while booting. This is done by editing the file com.apple.Boot.plist in the Extra Folder of the Chameleon USB-Stick.

To disable the verbose booting you must change the "Kernel Flags" and the "Wait" key from:
<key>Kernel Flags</key>
<string>-v</string>
<key>Wait</key>
<string>Yes</string>

to:
<key>Kernel Flags</key>
<string></string>
<key>Wait</key>
<string>No</string>


To boot automatically your OS X installation you must first find out on which harddisk/partition it is installed. Chameleon numbers the harddisk chronologically starting with 0 and the partitions starting with 1. The Chameleon USB-Stick itself becomes disk number 0. Just press the "TAB" key at the Chameleon Boot Menu to see this Menu:


Find the hd(x,y) for your OS X Installation and configure the "Default Partition" in com.apple.Boot.plist. My OS X installation is on hd(1,2). It is also a good idea to configure a timeout, to be able to access the Chameleon Boot Menu and to boot from other disks or partitions:
<key>Default Partition</key>
<string>hd(1,2)</string>
<key>Timeout</key>
<string>10</string>


If you don't like the Chameleon Boot Logo, then you can enable the standard Apple Boot Logo with the following entry in com.apple.Boot.plist:
<key>Legacy Logo</key>
<string>Yes</string>


The complete com.apple.Boot.plist should look like this:
<?xml version="1.0" encoding="UTF-8"?>
<!DOCTYPE plist PUBLIC "-//Apple//DTD PLIST 1.0//EN" "http://www.apple.com/DTDs/PropertyList-1.0.dtd">
<plist version="1.0">
<dict>
<key>Kernel</key>
<string>mach_kernel</string>
<key>Kernel Flags</key>
<string></string>
<key>Default Partition</key>
<string>hd(1,2)</string>
<key>Legacy Logo</key>
<string>Yes</string>
<key>Timeout</key>
<string>10</string>
<key>Wait</key>
<string>No</string>
<key>GraphicsEnabler</key>
<string>Yes</string>
<key>EthernetBuiltIn</key>
<string>Yes</string>
</dict>
</plist>

Sonntag, 11. Oktober 2009

8.) [10.6] Install Mac OS X

Time to install Mac OS X 10.6. Shutdown your PC. Connect the prepared harddisk. Insert the prepared Chameleon USB-Stick. Power on the PC and enter the BIOS setup. Verify all the BIOS settings as explained here. Save and Exit the BIOS setup.

Chameleon should boot from the USB-Stick and presents you this screen. I've enabled some debug output for. You can disable these debug outputs if you have successfully installed OS X and system is up and running.

Hit ENTER to boot the Mac OS X 10.6 Install DVD (restored to HD). You will see some debug messages from Chameleon.

Hit any key to continue booting OS X. It will boot in verbose mode.

After some time you can see the Mac OS X Installer. Follow the Installer.

Select the Partiton "Mac OS X" as install target. You can click on "Customize" to customize your OS X installation.

Time for a cup of coffee...

At the End you will see this Error. Ignore it! The installtion went fine. Just restart.

Once again in Chameleon. You will see two bootable Installation now. Select "Mac OS X" with the cursor keys (right/left) as show in the photo and hit ENTER.

Once again the Chameleon debug messages. Hit any key to continue...

Now you will see the Mac OS X Welcome Video Clip...

... and some additional steps to complete the installation process.

Finally the Mac OS X 10.6 Desktop.

If you have a working Internet connection, then OS X will check and download (in background) all available software updates. Go on and install all... it's safe to do ;-)

After one final restart you are done. Congratulations!!!

Samstag, 10. Oktober 2009

7.) [10.6] Setup the Chameleon USB-Stick

Finally the last step before you can start installing Mac OS X. I will show you how to setup the Chameleon USB-Stick. You need a Hardware UUID and must download this stuff as mentioned already here:
  1. Chameleon 2.0 RC3 (Chameleon-2.0-RC3-r658-bin.tar.gz)
  2. Kernel extensions and Chameleon support files (Link)
Insert the Chameleon USB-Stick you have prepared in step "6.) [10.6] Prepare the Chameleon USB-Stick" and save the two downloaded files on the Chameleon USB-Stick. To get rid of the "com.apple.quarantine" extended attribute launch the Terminal and run the following commands (the shell prompt is blue, the commands you have to enter are green):
[~] > cd /Volumes/Chameleon/
[/Volumes/Chameleon] > xattr -d com.apple.quarantine Chameleon_Support_Files.zip
[/Volumes/Chameleon] > xattr -d com.apple.quarantine Chameleon-2.0-RC3-r658-bin.tar.gz

Double Click each downloaded file so that the Finder will extract the content. This should give you the following files on the USB-Stick:


Adapt the Chameleon USB-Stick according to your hardware. Modify the Extra/smbios.plist as explained already here:
  • SMboardmanufactor: the mainboard manufactor
  • SMboardproduct: the mainboard type
  • SMmemmanufacter_X: the memory manufactor
  • SMmempart_X: the memory part number
  • SMmemserial_X: the memory serial number
  • SMmemspeed: the memory speed in Mhz
  • SMmemtype: the memory type DDR2=19, DDR3=24
Replace the Extra/DSDT.aml file with the patched DSDT for your mainboard. Configure the UUID you are going to use by modifying the kernel extensions Extra/10.5/Extensions/UUID.kext and Extra/10.6/Extensions/PlatformUUID.kext with right-click with the mouse and select "Show Package Content". Then edit the file Content/Info.plist in each kernel extension. Insert/Replace the UUID for the "key/value" UUID-key (10.5: UUID.kext) and PlatformUUID (10.6: PlatformUUID.kext).

10.5 UUID.kext/Content/Info.plist
   <key>CFBundleIdentifier</key>
<string>com.free.driver.UUID</string>
<key>IOClass</key>
<string>UUID</string>
<key>IOMatchCategory</key>
<string>UUID</string>
<key>IOProviderClass</key>
<string>IOPlatformExpertDevice</string>
<key>IOResourceMatch</key>
<string>SMBIOS</string>
<key>UUID-key</key>
<string>00000000-0000-1000-8000-001FD02E7359</string>

10.6 PlatformUUID.kext/Content/Info.plist
   <key>CFBundleIdentifier</key>
<string>com.superhai.driver.PlatformUUID</string>
<key>IOClass</key>
<string>PlatformUUID</string>
<key>IOMatchCategory</key>
<string>PlatformUUID</string>
<key>IOProviderClass</key>
<string>IOResources</string>
<key>IOResourceMatch</key>
<string>IOKit</string>
<key>PlatformUUID</key>
<string>00000000-1008-1000-8000-001FD02E7359</string>
You must also configure the cpu type you are going to use for your hackintosh in the CPUInjector.kext. If you also have a Intel Quad Core CPU, then you can leave it as it is, because it's preconfigured to use a Quad Core CPU. If not read this post and edit Info.plist of the CPUInjector kernel extensions and replace the value for cpu-type with the one for your CPU. Use the Base64 encoded value.

CPUInjector.kext/Content/Info.plist
   <key>IOProviderClass</key>
<string>IOPlatformDevice</string>
<key>entriesToAdd</key>
<dict>
<key>cpu-type</key>
<data>
AQU=
</data>
</dict>

To install Chameleon on the USB-Stick you must find out which disk identifier is used for your USB-Stick. In the still open Terminal run this command:
[/Volumes/Chameleon] > diskutil list
/dev/disk0
#: TYPE NAME SIZE IDENTIFIER
0: GUID_partition_scheme *465.8 Gi disk0
1: EFI 200.0 Mi disk0s1
2: Apple_HFS MacOS X 400.9 Gi disk0s2
3: Microsoft Basic Data BOOTCAMP 64.6 Gi disk0s3
/dev/disk1
#: TYPE NAME SIZE IDENTIFIER
0: Apple_partition_scheme *930.9 Gi disk1
1: Apple_partition_map 31.5 Ki disk1s1
2: Apple_HFS asere 930.9 Gi disk1s2
/dev/disk2
#: TYPE NAME SIZE IDENTIFIER
0: GUID_partition_scheme *1.9 Gi disk2
1: Apple_HFS Chameleon 1.8 Gi disk2s1
The command "diskutil list" list all disks and all of their partitions. In my case the disk identifier is "disk2" (marked red). The device is /dev/disk2 an the partition is /dev/disk2s1. Please use for all upcoming terminal commands your disk identifier! It could be different than mine. I will continue using disk2.

Now let's install Chameleon. Run these commands in the Terminal and do not forget to use your disk identifier. First you must remount the USB-Stick to get rid of the "noowners", "nosuid" and "nodev" mount options as explained already here:
[/Volumes/Chameleon] > cd
[~] > sudo -s
Password:
root [~] > sync
root [~] > umount -f /Volumes/Chameleon/
root [~] > mkdir temp
root [~] > mount_hfs /dev/disk2s1 temp
root [~] > mount
/dev/disk0s2 on / (hfs, local, journaled)
devfs on /dev (devfs, local)
fdesc on /dev (fdesc, union)
/dev/disk0s3 on /Volumes/BOOTCAMP (ntfs, local, read-only, noowners)
map -hosts on /net (autofs, automounted)
map auto_home on /home (autofs, automounted)
/dev/disk1s2 on /Users/asere (hfs, local, nodev, nosuid, journaled)
/dev/disk2s1 on /Users/asere/temp (hfs, local)
The mount command shows you that the USB-Stick (/dev/disk2s1) is mounted to temp without the "noowners", "nosuid" and "nodev" options. Now set the owner and group of all files and directories in the Chameleon Extra folder to root:wheel (0:0):
root [~] > cd temp
root [~/temp] > chown -R 0:0 Extra
Finally it's time to install Chameleon. Please note the "r" before the disk identifier. Using "rdisk" isn't a typo:
root [~/temp] > cp Chameleon-2.0-RC3-r658-bin/i386/boot .
root [~/temp] > chmod 755 boot
root [~/temp] > dd if=Chameleon-2.0-RC3-r658-bin/i386/boot1h of=/dev/rdisk2s1
2+0 records in
2+0 records out
1024 bytes transferred in 0.004469 secs (229138 bytes/sec)
root [~/temp] > fdisk -f Chameleon-2.0-RC3-r658-bin/i386/boot0 -u -y /dev/rdisk2
root [~/temp] > cd
root [~] > sync
root [~] > umount -f temp
root [~] > rmdir temp
Congratulations! You are done and can remove the USB-Stick now to install Mac OS X 10.6.

Unknown CPU / About this Mac [Update]

A reader of my Blog pointed my to the Digital DJ Blog. He has found a way to fix the "Unknown CPU" problem. Editing the file "/System/Library/CoreServices/Resources/English.lproj/AppleSystemInfo.string" is only cosmetic. For the OS the CPU is still "Unkown". His solution is a kernel extension, which injects a "cpu-type" property into the IORegistry. Read the blog for more info about this topic.

Currently known CPU types of OS X:
  1. Intel Xeon Quad: 1281 - 0x501 - 0x0105 (little endian) - AQU= (Base64)
  2. Intel Core 2 Duo: 769 - 0x301 - 0x0103 (little endian) - AQM= (Base64)
  3. Intel Core Solo: 257 - 0x101 - 0x0101 (little endian) - AQE= (Base64)
For the time being I'll integrate the CPUInjector.kext from Digital DJ. I've already updated the kernel extensions and support files package in the post "2.) [10.6] What do you need"

Dienstag, 6. Oktober 2009

6.) [10.6] Prepare the Chameleon USB-Stick

Put your USB-Stick in any MAC you have and start Disk Util (Application -> Utilities -> Disk Utility).
  1. Start Disk Utility
  2. Select the USB-Stick itself as show in the photo (do not select a partition on the stick).
  3. Select Partition
  4. Under Volume Scheme select 1 Partition
  5. Click "Options" and in the Options sheet select "GUID Partition Scheme"
  6. Choose a Name without spaces (I used Chameleon)
  7. Choose Format "Mac OS Extended" (this allows you do modify the stick under Linux)
  8. Click "Apply"
  9. DONE (it should look like in the foto)

Montag, 5. Oktober 2009

5.) [10.6] Restore the Mac OS X Install DVD to HardDisk

One major drawback of Chameleon is the missing "Mac OS X Install DVD" boot support. You cannot boot an Install DVD directly. There are workarounds with special, custom made Boot DVDs, but I think the easiest solution is to restore the "Mac OS X Install DVD" to a HardDisk with Disk Utility. This allows you to boot the Installer from the HardDisk, which in turn works great under Chameleon and even on a real Mac. A positive side effect of this approach is an enormous speedup of the installation process due to the use of a harddisk instead of a slow optical drive.

There are many possibilities to restore the Install DVD onto a harddisk. On a separate internal or external harddisk, on a free partition or even on an USB-Stick (>= 8GB). It's up to you. I will restore the Install DVD on the same harddisk on which you are going to install Mac OS X 10.6.

Connect the harddisk on which you are planning to install Mac OS X 10.6 to a real Macintosh and launch Disk Utility. For this guide I will use a Samsung 500GB HD502SJ.

In Disk Utility select the new HD, click on Partition and selct as Volume Scheme 2 Partitions.

Then click the Options button and select GUID Partiton Table + OK.

Now select the partition "Untitled 2" with a click go to Size and enter 16 and confirm with ENTER. Go to Name and enter 10.6 Install DVD. Leave the Format as it is: Mac OS Extended (Journaled).

Select the first partition "Untitled 1" and rename it to Mac OS X (or a name of your choice). On this partition you will install Mac OS X. Leave the Format as it is: Mac OS Extended (Journaled).

Now click the Apply button and then the Partition button.


You are done with the preparations of the HD. Now let's restore the "Snow Leopard" Mac OS X Install DVD onto the partition "10.6 Install DVD". Insert the Install DVD and select the partiton "10.6 Install DVD" on the left side as shown in the photo. The click on Restore.

Now Drag-and-Drop the "Mac OS X Install DVD" from the left side to the Source Textfield. Repeat this step with the "10.6 Install DVD" HD-Partition to the Destination Textfield. Then click on the Restore button, acknowledge the sheet and provide the Administrator credentials.

Take a cup of coffee... and you are DONE.

Sonntag, 4. Oktober 2009

4.) [10.6] Prepare a DSDT

DSDT is an acronym for Differentiated System Description Table. I've already wrote about it. Please read this article first as an introduction and to get some general infos. Modifying the original DSDT from your mainboard is the most complicated part of all. Unfortunately Mac OS X 10.6 "Snow Leopard" does not boot with the most of the original DSDTs.

First you might look into the "DSDTs ready for use with Chameleon" thread in the efixusers.com forum. There you can find a lot of already patched DSDTs I've made. Maybe you will find the one you need for your mainboard/BIOS-version already there. If not leave me a request there or continue here...

Using an Ububtu LiveCD is the easiest way to obtain the original DSDT. Boot the Ubuntu LiveCD and start a Terminal: Applications->Accessories->Terminal

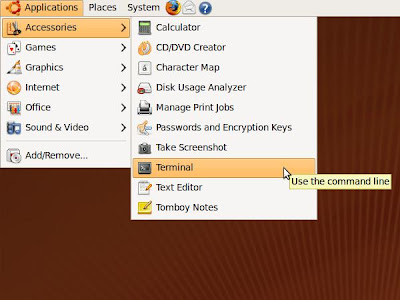
In the Terminal run the following commands to dump the DSDT into the file dsdt.aml (will appear on the Desktop):
ubuntu@ubuntu:~$ cd Desktop
ubuntu@ubuntu:~/Desktop$ sudo cat /proc/acpi/dsdt > dsdt.aml


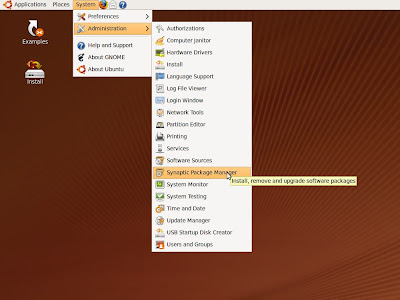
You can go even further and modify the DSDT right here using the Ubuntu LiveCD. To do so install the AML-Disassembler/Compiler "iasl". Open the Synaptic Package Manager:
System->Administration->SynapticPackageManager

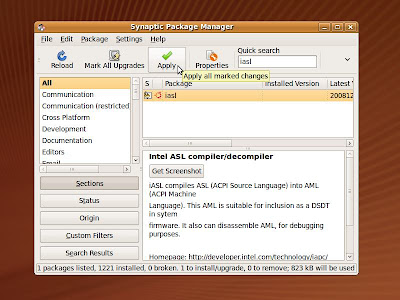
Enter "iasl" in Quick search, click on the Checkbox left from the iasl Package and select "Mark for Installation", then click on Apply. This will install the "iasl" compiler/decompiler.


In a first step you must decompile the DSDT. In the still open Terminal run:
ubuntu@ubuntu:~$  iasl -d dsdt.aml

Intel ACPI Component Architecture
AML Disassembler version 20081204 [Jan 10 2009]
Copyright (C) 2000 - 2008 Intel Corporation
Supports ACPI Specification Revision 3.0a

Loading Acpi table from file dsdt.aml
Acpi table [DSDT] successfully installed and loaded
Pass 1 parse of [DSDT]
Pass 2 parse of [DSDT]
Parsing Deferred Opcodes (Methods/Buffers/Packages/Regions)
..................................................................................................................................................................................................................................................................................................................................................................................................................................................
Parsing completed
Disassembly completed, written to "dsdt.dsl"
Now fix all Errors and Warnings and the HPET, RTC and TMR device as described here.

Another very important fix for "Snow Leopard" is the CMOS Reset Fix. Without this fix AppleRTC.kext will corrupt the CMOS NVRAM used by the BIOS, so that you must reconfigure the BIOS settings at every Boot/Restart. Open "dsdt.dsl" in your favorite editor and find the RTC device.
Device (RTC)
{
Name (_HID, EisaId ("PNP0B00"))
Name (ATT0, ResourceTemplate ()
{
IO (Decode16,
0x0070, // Range Minimum
0x0070, // Range Maximum
0x00, // Alignment
0x04, // Length
)
IRQNoFlags ()
{8}
})
Name (ATT1, ResourceTemplate ()
{
IO (Decode16,
0x0070, // Range Minimum
0x0070, // Range Maximum
0x00, // Alignment
0x04, // Length
)
})
Method (_CRS, 0, NotSerialized)
{
Return (ATT1)
}
}
And change the length of the IO segment ATT1 (marked red) from 0x04 to 0x02.
Device (RTC)
{
Name (_HID, EisaId ("PNP0B00"))
Name (ATT0, ResourceTemplate ()
{
IO (Decode16,
0x0070, // Range Minimum
0x0070, // Range Maximum
0x00, // Alignment
0x04, // Length
)
IRQNoFlags ()
{8}
})
Name (ATT1, ResourceTemplate ()
{
IO (Decode16,
0x0070, // Range Minimum
0x0070, // Range Maximum
0x00, // Alignment
0x02, // Length
)
})
Method (_CRS, 0, NotSerialized)
{
Return (ATT1)
}
}
Chameleon RC2 introduced a new feature to autodetect the graphic card and the builtin ethernet ports (Time Machine Fix). Unfortunately this works only when the UID of the PCI root device PCI0 is 0. All Gigabyte DSDTs I've fixed are using UID=1 and therefore the autodetection does not work. Find the following _SB -> PCI0 -> Name (UID, 0x01) (marked red):
Scope (\_SB)
{
Device (PWRB)
{
Name (_HID, EisaId ("PNP0C0C"))
Method (_STA, 0, NotSerialized)
{
Return (0x0B)
}
}

Device (PCI0)
{
Name (_HID, EisaId ("PNP0A03"))
Name (_ADR, 0x00)
Name (_UID, 0x01)
Name (_BBN, 0x00)
Method (_S3D, 0, NotSerialized)
...and replace it with Name (UID, 0x00) (marked green):
Scope (\_SB)
{
Device (PWRB)
{
Name (_HID, EisaId ("PNP0C0C"))
Method (_STA, 0, NotSerialized)
{
Return (0x0B)
}
}

Device (PCI0)
{
Name (_HID, EisaId ("PNP0A03"))
Name (_ADR, 0x00)
Name (_UID, 0x00)
Name (_BBN, 0x00)
Method (_S3D, 0, NotSerialized)

Now you have a DSDT with all mandatory patches to run Mac OS X 10.6. Just compile it and use the resulting dsdt.aml along with Chameleon.
ubuntu@ubuntu:~$  iasl -ta dsdt.dsl

Intel ACPI Component Architecture
AML Disassembler version 20081204 [Jan 10 2009]
Copyright (C) 2000 - 2008 Intel Corporation
Supports ACPI Specification Revision 3.0a

ASL Input: dsdt.dsl - 5931 lines, 197099 bytes, 2427 keywords
AML Output: dsdt.aml - 18854 bytes, 667 named objects, 1760 executable opcodes

Compilation complete. 0 Errors, 0 Warnings, 0 Remarks, 31 Optimizations
These are some other useful DSDT patches. You can fix the USB Device Removal Warning for the EHCI ports, make Onboard Sound or the Powerbutton working. I will describe some of them later.

Samstag, 3. Oktober 2009

3.) [10.6] BIOS Settings

The BIOS settings are important for a successful Mac OS X 10.6 installation. Try to update to the latest BIOS version and make this before continuing with the DSDT part, because a newer BIOS might result in a different DSDT. I'm using BIOS version 10a (Beta). It has a newer AHCI BIOS version 1.20, which gives you a 10 seconds quicker boot time.

Important: To bring up Mac OS X 10.6 on your PC, I do recommend to not use any PCI/PCI-E expansion cards in the first step. Disable all the not needed onboard hardware, like Sound, UART, LPT, IDE, Floppy. Do not connect any special hardware to the USB or Firewire ports. Use only a USB mouse and a USB keyboard. If you have Mac OS X 10.6 up and running, then try to bring up all the other hardware step by step.

Do not overclock your system and take care of the DRAM voltage. My DRAM runs at 1066Mhz and according to the datasheet it needs 2,2V at that speed. But the BIOS only used 1,8V automatically, which gaves me a lot of kernel panics. I got a stable system only after I had changed the DRAM voltage manually to 2,1V.

Enter BIOS Setup and load the optimized default settings:


Enter MB Intelligent Tweaker to verify the BIOS defaults and to set DRAM speed and voltage:


Enter Standard CMOS Features to disable the Floppy:

Enter "Advanced BIOS Features" to setup the boot priority & order:


Enter "Integrated Peripherals" to enable SATA AHCI and disable Sound, SMART LAN, IDE, UART and LPT. You can also disable the second LAN port if you don't need it.

In "Power Management Setup" set Suspend Type to S3 and enable HPET 64Bit mode.


Freitag, 25. September 2009

2.) [10.6] What do you need

You will need the following to successfully install Mac OS X 10.6:
  • Mac OS X 10.6 "Snow Leopard" Installation DVD (the Upgrade DVD works fine)
  • Access to a working Mac to restore the Install DVD to a HD
  • A HardDisk to install "Snow Leopard" on it
  • A cheap and bootable USB-Stick to install Chameleon on it
  • Chameleon 2.0 RC3 (Link)
  • some Kernel extensions and Chameleon support files (Link)
  • a patched DSDT for your mainboard/BIOS-version
  • Ubuntu LiveCD (Link)
  • optional another free HardDisk/Partition/USB-Stick to restore the OS X Install DVD on it
You will also need a unique Hardware UUID. Wikipedia has more general info about UUIDs. The easiest way to make a UUID is to use the ethernet mac address of the onboard ethernet port of your mainboard. The Hardware UUID looks like this:

00000000-1008-1000-8000-001FD02E7359

My ethernet mac address is 00:1f:d0:2e:73:59. Replace the red part with your ethernet mac address. You can find it out using the Ubuntu LiveCD. Open a Terminal an issue the following command:
ubuntu@ubuntu:~$  ifconfig
eth0 Link encap:Ethernet HWaddr 00:1f:d0:2e:73:59
inet addr:192.168.1.103 Bcast:192.168.1.255 Mask:255.255.255.0
inet6 addr: fe80::21f:d0ff:fe2e:7927/64 Scope:Link
UP BROADCAST RUNNING MULTICAST MTU:1500 Metric:1
RX packets:394 errors:0 dropped:0 overruns:0 frame:0
TX packets:266 errors:0 dropped:0 overruns:0 carrier:0
collisions:0 txqueuelen:1000
RX bytes:451298 (451.2 KB) TX bytes:29571 (29.5 KB)
Interrupt:251 Base address:0xe000

lo Link encap:Local Loopback
inet addr:127.0.0.1 Mask:255.0.0.0
inet6 addr: ::1/128 Scope:Host
UP LOOPBACK RUNNING MTU:16436 Metric:1
RX packets:4 errors:0 dropped:0 overruns:0 frame:0
TX packets:4 errors:0 dropped:0 overruns:0 carrier:0
collisions:0 txqueuelen:0
RX bytes:240 (240.0 B) TX bytes:240 (240.0 B)
Search the HWaddr for the interface eth0 (marked red). This is the ethernet mac address to use for the UUID.

Dienstag, 22. September 2009

1.) [10.6] Let's start with Hardware Requirements

You need a compatible hardware to run Mac OS X 10.6 "Snow Leopard". You can find a list of proofed, working hardware here in the efixusers.com forum. I'm using this hardware:

  • Motherbord: Gigabyte GA-EP45-DS3 (BIOS F10a)
  • CPU: Intel Q6600 @ 2,4 GHz
  • GFX: Asus Geforce 7300 GT 256MB passiv
  • MEM: 4GB OCZ PC1066 @ 1066 / 2,1V
  • HDD: Samsung 1TB HD103SJ
  • DVD: LGGH22NS30

This translates into the following hardware:
  • Intel ICH10 Soutbridge (10.6 native support)
  • Realtek ALC889A sound chip (disabled in BIOS)
  • 2x Realtek 8111C Gigabit Ethernet
  • T.I. TSB43AB23 Firewire (native support)
  • JMicron 368 IDE (disabled in BIOS)
  • nVidia 7300GT 256MB

Dienstag, 15. September 2009

Mac OS X 10.6.1 and Chameleon 2.0 RC3 are out

I know... this isn't really a news anymore, but a good starting point for the upcoming Chameleon + Snow Leopard guide. Chameleon 2.0 RC3 provides Snow Leopard support and some other new features. More info on the Chameleon Project Homepage.

I have Mac OS X 10.6.1 already up and running, using a Chameleon 2.0 RC3 USB-Stick.


Montag, 14. September 2009

Donationpage

Dear Readers, there are legitimate questions whether the donations page made by Knotty (Thank you my friend!) is a fake or not. I can assure you that the page is authentic and has been published with all honest intention. Every donation made by this page will go directly to my Paypal account.

Thank you
AsereBLN

Mittwoch, 9. September 2009

Dear Readers

last Sunday I've returned from a longer trip to carribean. It was wonderful and I really enjoyed it. This monday I received a letter from a law firm. As announced in the official EFI-X™ forum by Wilhem von Vnukov, ASEM issued legal action against me, sending me a cease-and-desist (in german: Abmahnung). I cannot give further details here, because it's a open legal case.

Together with my lawyer we have worked out a acceptable solution. Unfortunately this solution demands that I never again can say anything negative about EFI-X™ or ASEM. I'm also demanded to remove all posts and articles about ASEM and EFI-X™ in my Blog, in different forums and even in Google. I have to start cleaning up before this Friday. I feel very sorry for doing this, but I am only a private person and I do not have such a strong financial background like a company. Coram iudice et in alto mare in manu dei soli sumus. But I'm also quite sure that things will go on without my person being part of it.

OK folks, enough with ASEM and EFI-X™. I'm done with them. ¡Ya... Se acabó!

In the future I will devote myself to support the efixusers.com forum and the Chameleon based solution. To bring it up and running on your machines and maybe I can help to improve Chameleon further, for instance in terms of cd/dvd boot support.

Sincerely yours
AsereBLN

Donnerstag, 13. August 2009

Does ...

Article removed due to legal reasons. Sorry!

Sonntag, 9. August 2009

Very ...

Article removed due to legal reasons. Sorry!

Donnerstag, 6. August 2009

EFI-X™ Dongle Autopsy [Update]

As promised here are some new infos and highres photos of the EFI-X™ dongle. If you ever wondered what's inside the EFI-X™, here you will find some answers.

I could find out which microcontroller is used for the EFI-X™. It was not that difficult. Searching for a microcontroller:
  1. with a 64-Pin TQFP package
  2. and USB support
  3. an oscillator connected to pins 5 & 6
  4. USB D-/D+ connected to pins 44 & 45
... gaves me very quickly a Cortex™ M3 from STMicroelectronics. A test with a spectrum analyser ruled out, that the microcontroller runs very likely at 72Mhz. Got a peak at 8Mhz (the resonator frequency), a small peak at 36Mhz, a strong peak at 72Mhz and another small peak at 108Mhz (72+36). So the microcontroller must be a STM32F103Rx. To figure out the exact model one must connect a JTAG debugger. The pads to do so are there. The EFI-X™ V1.0 has no ESD Protection for the USB data lines D+/D- and a simple 3.3V DC/DC converter.

The closed EFI-X™ Dongle:
EFiX autospy, disassemble, open, dongle

EFI-X™ PCB Frontside still sealed:
EFI-X autospy, disassemble, open, sealed frontside

EFI-X™ PCB Backside still sealed:
EFiX autospy, disassemble, open, sealed backside

EFI-X™ opening the case:
EFI-X autospy, disassemble, open, backside

EFI-X™ case opened and PCB:
EFiX autospy, disassemble, open, PCB

EFI-X™ clean PCB with some explanations:
EFI-X autospy, disassemble, open, PCB

More info in the old post here.

Mac OS X 10.5.8 is out

Last night Apple has released Mac OS X 10.5.8. I did an automatic update via Apple Software Update (165MB). The update itself went fine without any problems.

I'm running Mac OS X 10.5.8 and Chameleon 2.0 RC2 now and have no issues so far:
  • Sleep/Wakeup/Restart/Shutdown is working
  • TimeMachine is working
  • Bonjour is working
  • Ethernet is working
  • full resolution graphic with CI/QE is working

Dienstag, 28. Juli 2009

How to enable/use the new Features of Chameleon 2.0 RC2

I had some problems to find out how to enable and use the new features of Chameleon 2.0 RC2. These options are hidden in the Installer and not enabled by default. Push the Customize button and open Options:


Selecting one of these options will make an entry in the com.apple.Boot.plist file located in the Extra folder. Here is the result if you select all the options.

Extra/com.apple.Boot.plist:

<?xml version="1.0" encoding="UTF-8"?>
<!DOCTYPE plist PUBLIC "-//Apple Computer//DTD PLIST 1.0//EN" "http://www.apple.com/DTDs/PropertyList-1.0.dtd">
<plist version="1.0">
<dict>
<key>Kernel</key>
<string>mach_kernel</string>
<key>Kernel Flags</key>
<string></string>
<key>UHCIreset</key>
<string>y</string>
<key>GUI</key>
<string>n</string>
<key>GraphicsEnabler</key>
<string>y</string>
<key>ForceWake</key>
<string>y</string>
<key>ForceHPET</key>
<string>y</string>
<key>EthernetBuiltIn</key>
<string>y</string>
<key>EHCIacquire</key>
<string>y</string>
</dict>
</plist>


To use the new dynamic configuration features of Chameleon 2.0 RC2 you must delete the device-properties in your com.apple.Boot.plist. The device-properties you had made with EFIStudio.

Update: Unfortunately the new features are not working for me. Chameleon detects my nVidia 7300 GT graphic card and the 2 onboard ethernet chips, but after booting Mac OS X I only have VESA graphic and the ethernet ports are not built-in. Here is a screenshot of the Chameleon debug output:


Maybe I will find some time to dig into the Chameleon source code to fix this bug. I already compiled Chameleon and it worked, so I could start debugging. For the time being I will stay with my "old" Chameleon RC1 com.apple.Boot.plist:
<?xml version="1.0" encoding="UTF-8"?>
<!DOCTYPE plist PUBLIC "-//Apple//DTD PLIST 1.0//EN" "http://www.apple.com/DTDs/PropertyList-1.0.dtd">
<plist version="1.0">
<dict>
<key>Kernel</key>
<string>mach_kernel</string>
<key>Kernel Flags</key>
<string></string>
<key>Default Partition</key>
<string>hd(1,2)</string>
<key>Legacy Logo</key>
<string>Yes</string>
<key>Timeout</key>
<string>3</string>
<key>device-properties</key>
<string>ea02000001000000030000003f0000000100000002010c00d041030a0100000001010600041c0101060000007fff0400160000006200750069006c0074002d0069006e0000000500000001600200000d00000002010c00d041030a010000000101060000010101060000007fff04000e0000004e00560050004d0000002000000001000000000000000000000000000000000000000000000000000000220000005600520041004d002c0074006f00740061006c00730069007a006500000008000000000000101c0000006400650076006900630065005f00740079007000650000000f0000004e5644412c506172656e740e0000006e0061006d00650000000b000000646973706c617922000000400030002c006400650076006900630065005f00740079007000650000000b000000646973706c617922000000400031002c006400650076006900630065005f00740079007000650000000b000000646973706c6179100000006d006f00640065006c0000001a0000006e5669646961204765466f726365203733303020475420000000400031002c0063006f006d00700061007400690062006c00650000000e0000004e5644412c4e564d616314000000400030002c006e0061006d0065000000120000004e5644412c446973706c61792d4114000000400031002c006e0061006d0065000000120000004e5644412c446973706c61792d4220000000400030002c0063006f006d00700061007400690062006c00650000000e0000004e5644412c4e564d6163100000004e00560043004100500000001800000004000000000003000c00000000000007000000001e00000072006f006d002d007200650076006900730069006f006e0000002e0000006e5669646961204765466f7263652037333030204754204f70656e474c20456e67696e65205b4546495d3f0000000100000002010c00d041030a0100000001010600051c0101060000007fff0400160000006200750069006c0074002d0069006e0000000500000001</string>
</dict>
</plist>

Update 2: The autodetection is working, but this new Chameleon feature needs teh value UID=0 for the PCI-root-device PCI0. Unfortunately all Gigabyte mainboards I has seen so far are using the value UID=1. This can be fixed by patching the DSDT (change is marked green):
Scope (\_SB)
{
Device (PWRB)
{
Name (_HID, EisaId ("PNP0C0C"))
Method (_STA, 0, NotSerialized)
{
Return (0x0B)
}
}

Device (PCI0)
{
Name (_HID, EisaId ("PNP0A03"))
Name (_ADR, 0x00)
Name (_UID, 0x00)
Name (_BBN, 0x00)
Method (_S3D, 0, NotSerialized)

Chameleon 2.0 RC2 is out

Exiting news! Chameleon 2.0 RC2 is released. Build number is 640. This new version has many bug fixes and also some really cool features. These features are:
  • dynamic nVidia Graphic Card detection
  • setting the "built-in" flag for onboard ethernet (TimeMache Fix)
  • hiding of non-bootable HFS partitions
  • automatic RAID booting
You can download the Installer Package, the binaries and even the source code on the Chameleon Project Homepage.

Mittwoch, 22. Juli 2009

EFI-X™ Module Autopsy

After I got my EFI-X™ back, I thought to sell it in eBay. I don't need it anymore. The Chameleon solution works better and I have the choice and the possibility to fix all issues by myself.

I was so curious about what's inside this "holy" EFI-X™ module, that I decided to open it. OK, I will loose some money, but my curiosity was greater :-)))

Open the module was not that difficult as I thought. Got this done without any visible trace on the enclosing. The front and the backside of the PCB was potted with some black plastic sealing. But I could remove the "protection" quite easy with a chemical treatment.

Here are the Photos. For the time being only in low resolution.

EFI-X™ Frontside still with protection:


EFI-X™ Backside still with protection:


EFI-X™ Frontside disassembled:


EFI-X™ Backside disassembled:


Very first analysis: The EFI-X™ module is made of nothing special at all. The module uses only one USB-port. The second USB-port of the mainboard connector is unused and not connected (See the backside photos). There are a microcontroller (64pin TQFP package, maybe it's a CPLD/FPGA), a 8 MHz ceramic resonator, a 5V to 3.3V DC-DC converter and a flash memory (presumably 256MB). The PCB seems to be a 4 layer. The whole thing, inclusive PCB, case, cable and packaging should be cost less than 10 dollars, I guess.

As you can see, ASEM had removed the description/partnumber of the microcontroller and the flash memory with a Laser. I will find out to which pins the oscillator and the USB is connected. This is like a fingerprint to discover which microcontroller they are using.

Update: New infos and better photos here.

Montag, 20. Juli 2009

21.) USB "Device Removal" problem [Update]

The modified IOUSBFamily-343.4.4.kext from the InsanelyMac Forum did not work for me. It solved the "Device Removal" problem upon wakeup from sleep, but my USB-Soundsystem does not work with this patched IOUSBFamily and there are some other issues.

So I began to study the relevant code in detail. This is the function from IOUSBFamily.kext, which marks the EHCI controller as "external" aka "Card Type=PCI":
void
AppleUSBEHCI::CheckSleepCapability(void)
{
_controllerCanSleep = true;
_hasPCIPwrMgmt = false;
_onCardBus = (0 != _device->metaCast("IOCardBusDevice"));
if ( !_device->getProperty("AAPL,clock-id") &&
!((getPlatform()->getChipSetType() == kChipSetTypeGossamer) &&
getPlatform()->getMachineType() == kGossamerTypeYosemite) )
{
if (_device->getProperty("built-in")) {

if (_device->hasPCIPowerManagement(kPCIPMCPMESupportFromD3Cold)) {
_device->setProperty(kIOPCIPMEOptionsKey, kOSBooleanTrue);
if (_device->enablePCIPowerManagement(kPCIPMCSPowerStateD3) == kIOReturnSuccess) {
_hasPCIPwrMgmt = true;
setProperty("Card Type","Built-in");
}
}
} else {
if (_device->hasPCIPowerManagement()) {
_device->setProperty(kIOPCIPMEOptionsKey, kOSBooleanTrue);
if (_device->enablePCIPowerManagement() == kIOReturnSuccess) {
_hasPCIPwrMgmt = true;
setProperty("Card Type","Built-in");
}
}
}
if (!_hasPCIPwrMgmt) {
USBError(1, "AppleUSBOHCI[%p]::CheckSleepCapability - controller will be unloaded across sleep",this);
_controllerCanSleep = false;
setProperty("Card Type","PCI");
}

} else {
setProperty("Card Type","Built-in");
}
if ( _onCardBus ) {
setProperty("Card Type","CardBus");
USBLog(1, "AppleUSBEHCI[%p]::CheckSleepCapability - i CANNOT sleep(CardBus)", this);
_controllerCanSleep = false;
}
_ExpressCardPort = ExpressCardPort(_device);
_badExpressCardAttached = false;
}

IOPCIDevice::hasPCIPowerManagement() from IOPCIFamily.kext returns false and this is actually the problem. Why it does return false? It's a bug in IOPCIFamily.kext or it's the EHCI pci device itself? To figure that out I used lspci to dump the powermanagement capabilities of the EHCI controller in the ICH10 southbride. Here is the output of lspci for the two EHCI controller:
00:1d.7 USB Controller: Intel Corporation 82801JI (ICH10 Family) USB2 EHCI Controller #1
Subsystem: Giga-byte Technology GA-EP45-DS5 Motherboard
Region 0: Memory at e9304000 (32-bit, non-prefetchable) [size=1K]
Capabilities: [50] Power Management version 2
Flags: PMEClk- DSI- D1- D2- AuxCurrent=0mA PME(D0-,D1-,D2-,D3hot-,D3cold-)
Status: D0 PME-Enable- DSel=0 DScale=0 PME+

00:1a.7 USB Controller: Intel Corporation 82801JI (ICH10 Family) USB2 EHCI Controller #2
Subsystem: Giga-byte Technology GA-EP45-DS5 Motherboard
Region 0: Memory at e9305000 (32-bit, non-prefetchable) [size=1K]
Capabilities: [50] Power Management version 2
Flags: PMEClk- DSI- D1- D2- AuxCurrent=0mA PME(D0-,D1-,D2-,D3hot-,D3cold-)
Status: D0 PME-Enable- DSel=0 DScale=0 PME-

The EHCI controllers of the Gigabyte GA-EP45-DS3 mainboard are not advertising any PM capabilities:
  1. PME: D0=off
  2. PME: D1=off
  3. PME: D2=off
  4. PME: D3cold=off
  5. PME: D3hot=off
Therefore the EHCI controller are seen as external. I still don't know whether this is a problem of all ICH10 southbridges or only a typical problem of some Gigabyte mainboards. This is to output of lspci from my MacBook Pro 13. As you can see, the MacBook does advertise all PM capabilities:
00:04.1 USB Controller: nVidia Corporation Unknown device 0aa6 (rev b1)
Subsystem: nVidia Corporation Unknown device cb79
Region 0: Memory at 93489200 (32-bit, non-prefetchable)
Capabilities: [80] Power Management version 2
Flags: PMEClk- DSI- D1+ D2+ AuxCurrent=0mA PME(D0+,D1+,D2+,D3hot+,D3cold+)
Status: D0 PME-Enable- DSel=0 DScale=0 PME-
This is the lspci output from an ASUS mainboard I've found in the Internet. It has also an ICH10 southbrigde, but with advertised PM capabilities. So the problem of the missing PM capabilities is not related to the ICH10 southbrigde:
00:1a.7 USB Controller: Intel Corporation ICH10 USB2 EHCI Controller #2
Subsystem: ASUSTeK Computer Inc. Unknown device 82d4
Region 0: Memory at fe7ffc00 (32-bit, non-prefetchable) [size=1K]
Capabilities: [50] Power Management version 2
Flags: PMEClk- DSI- D1- D2- AuxCurrent=375mA PME(D0+,D1-,D2-,D3hot+,D3cold+)
Status: D0 PME-Enable- DSel=0 DScale=0 PME-


Update: There is a solution for this annoying bug. You can fix it by patching the EHCI devices in the DSDT. Gigabyte uses the names USBE and USE2 for EHCI devices. Here is the patch. You must at the green part:
Device (USBE)
{
Name (_ADR, 0x001D0007)
Method (_S3D, 0, NotSerialized)
{
If (LEqual (OSFL, 0x02))
{
Return (0x02)
}
Return (0x03)
}

Name (_PRW, Package (0x02)
{
0x0D,
0x03
})

Method (_DSM, 4, NotSerialized)
{
Store (Package (0x04)
{
"AAPL,clock-id",
Buffer (One)
{
One
},
"device-type",
Buffer (0x05)
{
"EHCI"
}
}, Local0)
DTGP (Arg0, Arg1, Arg2, Arg3, RefOf (Local0))
Return (Local0)
}

}

New Blog Layout

Do you like the new Layout of my Blog? I made the content area much wider, improved the style for preformatted text and started using Tags. Now the content area is over 700px wide and all the Terminal stuff is much better to read. A great help to dig into CSS was Safari. Safari has a nifty feature called Inspector. Make a right-click on an element of a website and choose Inspect Element. Safari will come up with this cool interactive Tool:


Donnerstag, 16. Juli 2009

20.) ACPI DSDT Table (Differentiated System Description Table)

I started diving into all this wired ACPI / DSDT stuff. The ACPI-Spec has more than 700 pages! Part of the ACPI is the DSDT. DSDT is an acronym for Differentiated System Description Table. This table contains the Differentiated Definition Block, which supplies the information and configuration information about the base system. Here are some useful link to start reading:
  1. ACPI - Advanced Configuration and Power Interface
  2. Linux/ACPI - DSDT: Overview
  3. HOWTO: Fix Common ACPI Problems (DSDT, ECDT, etc.)
  4. ACPI Downloads (eg. iASL Compiler/Disassembler, Source)
  5. DSDT Patcher - InsanelyMac Forum (contains Mac OS X iASL binary)
Each mainboard, even different BIOS version, has it's own DSDT. All Information I'm giving you here in this Blog is specific to the Gigabyte GA-EP45-DS3 mainboard with BIOS version F9. Your DSDT might look very similar and the patches/fixes/solutions should be done in a similar way, but I cannot guarantee this.

I managed to get, disassemble, compile the DSDT. I had to fix some errors in the DSDT, which is very common if you use the Intel iASL Compiler. Seems that the Microsoft Compiler is not so piggy and almost all mainboard makers using the Microsoft Compiler for their ACPI stuff. After this very first steps I started to modify the DSDT. I modified the RTC and the HPET section to make AppleRTC.kext and AppleIntelCPUPowerManagement.kext work. After that I could delete Disabler.kext from the Extra/Extensions folder of the Chameleon USB-stick. Great, isn't it!

To start working with DSDT you need the DSDT of your mainboard and an ASL Compiler/Disassembler like the iASL. You can download the tools from the InsanelyMac forum or here. These are tools for Mac OS X. Windows and Linux versions are also available in the net.

How to obtain the DSDT. Under Mac OS X run the script getDSDT.sh in the Terminal:
admin@MacBook [~/Downloads/Tools] > ls -la
total 1160
drwxr-xr-x@ 4 admin staff 136 Jul 16 18:20 .
drwx------+ 38 admin staff 1292 Jul 16 18:20 ..
-rwxr-xr-x@ 1 admin staff 252 Nov 2 2008 getDSDT.sh
-rwxr-xr-x@ 1 admin staff 587968 Oct 25 2008 iasl
admin@MacBook [~/Downloads/Tools] > ./getDSDT.sh
admin@MacBook [~/Downloads/Tools] > ls -la
total 1208
drwxr-xr-x@ 5 admin staff 170 Jul 16 18:20 .
drwx------+ 38 admin staff 1292 Jul 16 18:20 ..
-rw-r--r-- 1 admin staff 23454 Jul 16 18:20 dsdt.dat
-rwxr-xr-x@ 1 admin staff 252 Nov 2 2008 getDSDT.sh
-rwxr-xr-x@ 1 admin staff 587968 Oct 25 2008 iasl
It gives you the file dsdt.dat, which is the compiled DSDT. Under Linux it's even much easier. Issue "cat /proc/acpi/dsdt > dsdt.aml" and you have the compiled DSDT. Don't get the DSDT under an EFI-X™ controlled Mac, because it might be already modified/patched in some way. Use a Linux Live-CD (Ubuntu) or Chameleon without a DSDT in the Extra folder. Now disassemble the compiled DSDT:
admin@MacBook [~/Downloads/Tools] > ./iasl -d dsdt.dat

Intel ACPI Component Architecture
AML Disassembler version 20080926 [Oct 4 2008]
Copyright (C) 2000 - 2008 Intel Corporation
Supports ACPI Specification Revision 3.0a

Loading Acpi table from file dsdt.dat
Acpi table [DSDT] successfully installed and loaded
Pass 1 parse of [DSDT]
Pass 2 parse of [DSDT]
Parsing Deferred Opcodes (Methods/Buffers/Packages/Regions)
...............................
Parsing completed
Disassembly completed, written to "dsdt.dsl"
Now you can open the file "dsdt.dsl" with your favorite editor, but take care to save it as plain text. But first I will check whether I can compile the original DSDT without errors and warnings:
admin@MacBook [~/Downloads/Tools] > ./iasl -ta dsdt.dsl

Intel ACPI Component Architecture
ASL Optimizing Compiler version 20080926 [Oct 4 2008]
Copyright (C) 2000 - 2008 Intel Corporation
Supports ACPI Specification Revision 3.0a

dsdt.dsl 222: Method (\_WAK, 1, NotSerialized)
Warning 1080 - ^ Reserved method must return a value (_WAK)

dsdt.dsl 285: Store (Local0, Local0)
Error 4050 - ^ Method local variable is not initialized (Local0)

dsdt.dsl 290: Store (Local0, Local0)
Error 4050 - ^ Method local variable is not initialized (Local0)

ASL Input: dsdt.dsl - 5683 lines, 189412 bytes, 2339 keywords
Compilation complete. 2 Errors, 1 Warnings, 0 Remarks, 661 Optimizations
As you can see I got 2 errors and 1 warning. The original Gigabyte DSDT is buggy. The error 4050 can be fixed very easy. Actually Store(Local0, Local0) means nothing but a NOP. It stores the content of the local variable Local0 into Local0. The problem is, that Local0 is not initialized. Change it to for instance Store ("Local0", Local0) or Store(Zero, Local0). The warning 1080 comes out because the _WAK method must return a value. ACPI-spec 7.3.7 defines a return of a package with 2 integers. So inserting Return (Package (0x02) {Zero, Zero}) will fix the warning. Returning Zero is not critical, even Apple returns Zero in their DSDTs. All fixes are colored green
Method (_WAK, 1, NotSerialized)
{
...

If (OSFL)
{
Notify (\_SB.PWRB, 0x02)
}
Else
{
If (LEqual (RTCW, Zero))
{
Notify (\_SB.PWRB, 0x02)
}
}

Notify (\_SB.PCI0.USB0, Zero)
Notify (\_SB.PCI0.USB1, Zero)
Notify (\_SB.PCI0.USB2, Zero)
Notify (\_SB.PCI0.USB3, Zero)
Notify (\_SB.PCI0.USB4, Zero)
Notify (\_SB.PCI0.USB5, Zero)
Return (Package (0x02)
{
Zero,
Zero
})

}

Scope (_SI)
{
Method (_MSG, 1, NotSerialized)
{
Store (Zero, Local0)
}

Method (_SST, 1, NotSerialized)
{
Store (Zero, Local0)
}
}

Now lets compile the fixed DSDT:
admin@MacBook [~/Downloads/Tools] > ./iasl -ta dsdt.dsl

Intel ACPI Component Architecture
ASL Optimizing Compiler version 20080926 [Oct 4 2008]
Copyright (C) 2000 - 2008 Intel Corporation
Supports ACPI Specification Revision 3.0a

ASL Input: dsdt.dsl - 5686 lines, 188406 bytes, 2340 keywords
AML Output: dsdt.aml - 18151 bytes, 661 named objects, 1679 executable opcodes

Compilation complete. 0 Errors, 0 Warnings, 0 Remarks, 31 Optimizations

No warnings, no errors. Fine! You can download the fixed DSDT for my Gigabyte GA-EP45-DS3 mainboard here. To get AppleIntelCPUPowerManagement.kext and AppleRTC working, the devices HPET, RTC and TMR must be modified. The device order in my DSDT is TMR, HPET and RTC.

For the TMR device patch the method _CRS to return ATT6 (ResourceTemplate without IRQNoFlags:
Device (TMR)
{
Name (_HID, EisaId ("PNP0100"))
Name (ATT5, ResourceTemplate ()
{
IO (Decode16,
0x0040, // Range Minimum
0x0040, // Range Maximum
0x00, // Alignment
0x04, // Length
)
IRQNoFlags ()
{0}
})
Name (ATT6, ResourceTemplate ()
{
IO (Decode16,
0x0040, // Range Minimum
0x0040, // Range Maximum
0x00, // Alignment
0x04, // Length
)
})
Method (_CRS, 0, NotSerialized)
{
Return (ATT6)
}
}
For the HPET device patch method _CRS to return ATT3 (ResourceTemplate with IRQNoFlags) and method _STA to return 0x0f:
Device (HPET)
{
Name (_HID, EisaId ("PNP0103"))
Name (ATT3, ResourceTemplate ()
{
IRQNoFlags ()
{0}
IRQNoFlags ()
{8}
Memory32Fixed (ReadWrite,
0xFED00000, // Address Base
0x00000400, // Address Length
)
})
Name (ATT4, ResourceTemplate ()
{
})
Method (_STA, 0, NotSerialized)
{
Return (0x0F)
}

Method (_CRS, 0, NotSerialized)
{
Return (ATT3)
}
}
For the RTC device patch method _CRS to return ATT1 (ResourceTemplate without IRQNoFlags):
Device (RTC)
{
Name (_HID, EisaId ("PNP0B00"))
Name (ATT0, ResourceTemplate ()
{
IO (Decode16,
0x0070, // Range Minimum
0x0070, // Range Maximum
0x00, // Alignment
0x04, // Length
)
IRQNoFlags ()
{8}
})
Name (ATT1, ResourceTemplate ()
{
IO (Decode16,
0x0070, // Range Minimum
0x0070, // Range Maximum
0x00, // Alignment
0x04, // Length
)
})
Method (_CRS, 0, NotSerialized)
{
Return (ATT1)
}
}
Save and then compile it:
admin@MacBook [~/Downloads/Tools] > ./iasl -ta dsdt.dsl

Intel ACPI Component Architecture
ASL Optimizing Compiler version 20080926 [Oct 4 2008]
Copyright (C) 2000 - 2008 Intel Corporation
Supports ACPI Specification Revision 3.0a

ASL Input: dsdt.dsl - 5631 lines, 186571 bytes, 2312 keywords
AML Output: dsdt.aml - 18040 bytes, 661 named objects, 1651 executable opcodes

Compilation complete. 0 Errors, 0 Warnings, 0 Remarks, 31 Optimizations
Put the resulting compiled DSDT "dsdt.aml" in the Extra folder of the Chameleon USB-stick. You are now safe to remove Disabler.kext from the Extra/Extensions folder. Don't forget to rebuild Extensions.mkext. Download the final DSDT here.

Montag, 13. Juli 2009

19.) USB "Device Removal" problem upon wakeup from sleep

Another switcher discovered a problem with USB devices connected to the EHCI bus (aka USB2.0). Upon wakeup from sleep Mac OS X will display a "Device Removal" warning dialog if a USB device has been attached, for instance the Chameleon USB-stick. This is a real problem and can even destroy the filesystem on the device.

This bug exists at least for motherboards with the ICH10R southbridge as my Gigabyte GA-EP45-DS3 (F9). The Apple USB driver sees the onboard USB-ports as external (PCI-Card) and not as built-in and thus applies the wrong powermanagement capabilities. On sleep/wakeup the USB driver issues a "power off"/"power on" to the external ports, instead of suspend/resume as it should for internal ports. You can check whether your ports are internal or external in System Profiler or IORegistryExplorer.

External in System Profiler:

External in IORegistryExplorer:


There already exists a solution. A patched IOUSBFamily.kext kernel extension. Download a already compiled IOUSBFamily-343.4.4.kext or compile it by yourself using the source from the InsanelyMac Forum thread. Put this kext into your Chameleon Extra/Extensions folder, set permissions and ownership and rebuild the Extensions.mkext. After a reboot the EHCI USB ports are shown as internal.

Internal in System Profiler:

Internal in IORegistryExplorer:


You will find the interessting part of the patch in AppleUSBEHCI/Classes/AppleUSBEHCI_PwrMgmt.cpp. As you can see the port will be forced as internal with normal sleep capabilities, but this could break external PCI-USB Cards.
if (!_hasPCIPwrMgmt) {
// USBError(1, "AppleUSBEHCI[%p]::CheckSleepCapability - controller will be unloaded across sleep",this);
// _controllerCanSleep = false;
// setProperty("Card Type","PCI");
_controllerCanSleep = true;
setProperty("Card Type","Built-in");
}

The best solution is clearly to patch the DSDT. But this is still real magic for me and I have to dive into the DSDT stuff first to learn about it.

Sonntag, 12. Juli 2009

18.) About This Mac

I have a Intel® Q6600 CPU. This CPU is not known by Mac OS X. In the "About This Mac" panel a unknown cpu is shown. If you find this annoying you can change this easily by editing one file. It's only a cosmetic issue and absolutely not necessary. Edit the file /System/Library/CoreServices/Resources/English.lproj/AppleSystemInfo.strings as root (use sudo) and replace the "Unknown" for "UnknownCPUKind" with the string you wanna have displayed in the About panel. You must do that for each language you are using (English.lproj). If you don't know which CPU you are using type the following in terminal:
> sysctl -n machdep.cpu.brand_string
You can find more information in this thread: About this Mac - InsanelyMac Forum

I changed "UnknownCPUKind" = "Unknown" to "UnknownCPUKind" = "Intel Core 2 Quad Q6600" and know I have this "About This Mac" panel:

Mittwoch, 8. Juli 2009

17.) System Management BIOS

My Chameleon-EFI Mac already works perfectly for me, but there are still some cosmetic issues, like the Serialnumber or the information about the installed memory. This can be adjusted with a file called smbios.plist in the Extra folder of the Chameleon USB-stick. The values in this property-list defines the hardware on which Mac OS X is running. You will find more information about the SMBIOS in Wikipedia here. Mine smbios.plist looks like this:


The values "SMexternalclock" and "SMmaximalclock" will be set by Chameleon automatically with the real values. As I know these values are the only important ones, but thanks to Chameleon you don't have to care about it. I selected a Mac Pro for the values in smbios.plist because this Mac is very close to my PC.


Montag, 6. Juli 2009

Time Machine

I will give you now some info the problem with non working Time Machine.

Time Machine is a very user friendly and easy to use Backup solution from Apple. The backup it takes, is connected to Computer which made the backup. You cannot use a TM-backup from Computer "A" to restore something on Computer "B". To identify the Computer TM uses the Ethernet-MAC-address of the built-in Ethernet. Every MAC-address is globally unique and every MAC from Apple has ethernet, so it can be used to identify a computer, if the ethernet port is built-in. An exchangeable PCI-card, like the Netgear GA311, does not help, because the card can be removed (loosed MAC-address) or changed (another, different MAC-address). So TM only works if it can find an internal, built-in ethernet port.

This was exactly the I got from TM. It couldn't find any built-in ethernet port, although the two Realtek 8111C are onboard and hence built-in. For some reason Mac OS X does not detect the as built-in. I don't known how Apple detects their own ethernet as built-in.

I flagged the first onboard ethernet port as built-in using device-properties in the Chameleon com.apple.Boot.plist. I made this device-property with EFIStudio. See here.

16.) [10.5] Reboot and DONE!

Now it's time for the last reboot. After the reboot all should work fine. Full resolution graphic with CI/QE, fullspeed ethernet network, Time Machine and Bonjour. As you can see in the first foto, my Chameleon-EFI Mac could see my MacBook Pro via Bonjour. Gigabit ethernet to/from my Linux-NAS work as expected with speeds around 60-80 MByte/sec.


15.) [10.5] Network Services/Ports

To have a clean network installation you should clear all network preferences. Open Preferences -> Network. Delete all Network Services/Ports (with the Minus "-" sign). And then delete the following preferences files:
/Library/Preferences/SystemConfiguration/NetworkInterfaces.plist
/Library/Preferences/SystemConfiguration/com.apple.network.identification.plist
/Library/Preferences/SystemConfiguration/preferences.plist

and if you have

/Library/Preferences/SystemConfiguration/com.apple.airport.preferences.plist
To explain why this could be necessary for you I will tell you my case. I installed the Mac OS X which I'm using with my Chameleon-EFI Mac on my MacBook Pro (external USB-drive). The MacBook Pro has 1 Ethernet, 1 WLAN, 1 Bluetooth and 1 Firewire Network Service/Port. My Chameleon-EFI Mac has 2 Ethernet and 1 Firewire Network Service/Port. After the first boot it showed in Preferences->Network: 1 Ethernet, 1 Airport, 1 Bluetooth (all from my MacBook Pro) and 2 new Ethernet ports en2 and en3. I wanted to have the 2 Chameleon-EFI Mac ethernet ports as en0 and en1. To do so I must delete all the old stuff from the MacBook Pro.

14.) [10.5] Energy Saver Settings

Enable both Checkboxes "Allow power button to sleep the computer" and "Restart automatically after a power failure" in Preferences -> Energy Saver as show in the foto. This will make Shutdown/Sleep/Wakeup working correctly.

Samstag, 4. Juli 2009

13.) [10.5] com.apple.Boot.plist

To have a full resolution graphic card with working CI/QE (Core Image/Quartz Extreme) and a working Time Machine you must provide the Mac OS X onboard drivers with some info about your hardware. This is done by Chameleon and the com.apple.Boot.plist file in the Extra folder of your USB-Stick. Chameleon will inject the device properties which you already have created with EFIStudio into the Mac OS X kernel. The advantage of this approach is, that you don't have to modify your Mac OS X Installation. It remains plain vanilla and this is important for Software updates through Apple's Software Update Application.

You can find the original Mac OS X com.apple.Boot.plist under:
/Library/Preferences/SystemConfiguration/com.apple.Boot.plist

It's almost empty. Use it as a template for your new Chameleon com.apple.Boot.plist. It looks like this:


Copy it to your Desktop. Be careful to NOT move it! Copy it (hold the ALT key while drag-n-drop). Open the copy from the Desktop with your favorite Editor. You must at least add the device properties from EFIStudio. Mine has 2 additional parameters: Default Partition and Timeout. These two are for Chameleon to automatically boot from the right Disk/Partition. Chameleon counts disk starting from 0 and counts partitions starting from 1. Adjust hd(x,y) and the timeout value. Propertylist are XML and have Key-Value pairs. For instance to adjust the Chameleon Bootscreen timeout value find the Key Timeout and change (in the next line) the value (mine is 10). OK the most important things are the device properties. Add the key device-properties and in the next line between "string" and "/string" your device properties in HEX in only ONE line. Mine appears wrapped, but this is due to my editor. If you are done the com.apple.Boot.plist should look like this (but with different values):


Save it in plain text mode (apply Shift-Cmd-T in Textedit) and copy it as com.apple.Boot.plist into the Extra folder of your Chameleon-USB-Stick.

12.) [10.5] First Boot into Mac OS X

Now it's time for the first boot into Mac OS X. Put in your Chameleon USB-Stick an power on the PC. The Chameleon bootloader should welcome you with a similar Welcome screen:


Select the Disk with your Mac OS X Installtion (cursor keys) and hit ENTER. If you hit Cursor down Chameleon will present you a Menu to boot, for instance, in verbose mode.

If all went fine you will see your Mac OS X Desktop or Login Window. It will come up in one Vesa Graphic Mode. Mine came up in 1024x768 (no CI/QE). Login, unzip EFIStudio.zip to (for instance) your Desktop and start it.

Select Display and your Graphic Card from the list. Mine is a nVidia 7300 GT passiv with 256MB RAM. And click "Add Device"


EFIStudio will open this window with all the details of your Graphic card:


You can close the window. Go ahead an select "Ethernet" and "Add Device". Note the device in the list is your graphic card:


EFIStudio will open this window with all the details of your Graphic card and with one property for your ethernet:


The onboard ethernet will get the property "built-in" and this will make Time Machine happy. I going to explain this later in detail. Now you must save the device properties created by EFIStudio. At least click on "Save Hex" and save it to the Desktop. You must put this device properties in Hexmode in a special file called com.apple.Boot.plist. If you have saved the Hexdata you can close the window. EFIStudio lists now 2 devices, the graphic card and the ethernet controller with their device path. You can close EFIStudio now.

11.) [10.5] BIOS Settings

Because BIOS Settings are somewhat critical I'm posting mine. Take care off correct DRAM Voltage. I had an quiet instable system in the beginning. My SDRAM runs at 1066 Mhz (533Mhz x2) and my OCZ modules needs 2,2 V at that speed.

Other important settings:
  1. Hard Disk Boot Priority - The USB-Stick must be the first
  2. First Boot Device - USB-HDD or Hardisk
  3. SATA AHCI Mode - AHCI
  4. Green LAN - disabled
  5. HPET Support - enabled (I'm using 64 Bit)


New Info about Partitioning

Because my new USB-Stick has 2 GB, a lot more than I need for Chameleon, I decided to make a small EFI-Partition and a bigger partition to for general data exchange. For this reason it's better to have a "Master Boot Record" partition scheme. Good news. Chameleon works also perfectly with a MBR. The EFI-Partition has only a size of 256MB. It's formatted in HFS+ (Journaled). The general data partition "USB" has 1,63 GB. It's formatted in FAT32 for easier use.

I'm back :-)

Had a lot of work this week and no time to continue this little tutorial, but I will continue it tomorrow.

Today went to a local computer dealer and bought this real small USB-Sticks. It's a Transcend JetFlash T3. These sticks are absolutely thin and small. I bought two, to have always a backup.

Montag, 29. Juni 2009

Question

Anybody can give me a hint how to make the posts column wider so that preformated text does not wrap around?

Sonntag, 28. Juni 2009

10.) [10.5] Some Terminal Work

Now it's time for some work in the terminal. Don't be affraid, it's quite easy. The goal of this steps is to cleanup the USB-Stick, set the owner and permissions for kernel extensions and to build the kernel extensions cache file.
  1. Login into an account with Administrator rights
  2. Insert the EFIBOOT USB-Stick
  3. Open the Terminal Application (Applications -> Utilities)
  4. Become root with by entering "sudo -s" and providing your administrator account password

If you insert a removeable drive like an USB-Stick it gets mounted by Mac OS X with some options we don't want, like nosuid or noowners. Therefore we have to remount the USB-Stick without this special flags. Ok let's start. The shell promt is blue. The commands you have to enter are green and the output of the commands is dark red. To get help for a command you can enter "man commandname". For instance, if you wanna know something about the "mount" command enter:
root@MacBook [~] > man mount
MOUNT(8) BSD System Manager's Manual MOUNT(8)

NAME
mount -- mount file systems

SYNOPSIS
mount [-adfruvw] [-t ufs | lfs | external_type]
mount [-dfruvw] special | node
mount [-dfruvw] [-o options] [-t ufs | lfs | external_type] special node

DESCRIPTION
The mount command calls the mount(2) system call to prepare and graft a
special device or the remote node (rhost:path) on to the file system tree
at the point node. If either special or node are not provided, the
appropriate information is taken from the fstab(5) file.

The system maintains a list of currently mounted file systems. If no
arguments are given to mount, this list is printed.

The options are as follows:

-a All the filesystems described in fstab(5) are mounted. Excep-
tions are those marked as ``noauto'' or are excluded by the -t
flag (see below).

-d Causes everything to be done except for the actual system call.
This option is useful in conjunction with the -v flag to deter-
mine what the mount command is trying to do.

-f Forces the revocation of write access when trying to downgrade a
filesystem mount status from read-write to read-only.
:

This gives you the manpage of the command mount. Within man you can go forward with "f" or "space" and backwards with "b". To leave "man" press "q". Even "man man" is possible :) OK... now let's really star us with the terminal work. First run "mount" without arguments to find out which device our USB-Stick is and there it is mounted.
root@MacBook [~] > mount
/dev/disk0s2 on / (hfs, local, journaled)
devfs on /dev (devfs, local)
fdesc on /dev (fdesc, union)
map -hosts on /net (autofs, automounted)
map auto_home on /home (autofs, automounted)
/dev/disk0s3 on /Volumes/BOOTCAMP (ntfs, local, read-only, noowners)
/dev/disk1s2 on /Users/admin (hfs, local, nodev, nosuid, journaled)
/dev/disk2s1 on /Volumes/EFIBOOT (hfs, local, nodev, nosuid, journaled, noowners)

Some background info about Unix Devices. Under Unix devices can be accessed through special device files. You can find these device files normally in the directory /dev. Harddisks and also USB-Stick are named /dev/disk or /dev/rdisk. The first number is the disk counter. Then comes an "s" (stands for slice/partition) and another number, which is the partition number. You can see that the USB-Stick is the device /dev/disk2 and /dev/disk2s1 is the EFIBOOT partition on the USB-Stick. You can find this info also in the Disk Utility. Select the disk or partition and then "Info". Disk Identifier is the same as the device name under /dev. OK, now let's unmount and remount the USB-Stick. Find out which disk number has the USB-Stick in your case. In my case it is the number 2.
root@MacBook [~] > umount -f /Volumes/EFIBOOT
root@MacBook [~] > mkdir efitemp
root@MacBook [~] > mount_hfs /dev/disk2s1 efitemp/
root@MacBook [~] > mount
/dev/disk0s2 on / (hfs, local, journaled)
devfs on /dev (devfs, local)
fdesc on /dev (fdesc, union)
map -hosts on /net (autofs, automounted)
map auto_home on /home (autofs, automounted)
/dev/disk0s3 on /Volumes/BOOTCAMP (ntfs, local, read-only, noowners)
/dev/disk1s2 on /Users/admin (hfs, local, nodev, nosuid, journaled)
/dev/disk2s1 on /Users/admin/efitemp (hfs, local, journaled)

The USB-Stick is mounted now at the directory efitemp (which was created by mkdir efitemp) and without these special option (nosuid, noowner). Let's start with some cleanups.
root@MacBook [~] > cd efitemp
root@MacBook [~/efitemp] > ls -la@
total 6336
drwxrwxr-x 17 root wheel 646 Jun 28 21:56 .
drwx------+ 35 admin staff 1258 Jun 28 23:31 ..
-rw-rw-r--@ 1 _unknown _unknown 6148 Jun 28 00:49 .DS_Store
com.apple.FinderInfo 32
drwx------ 3 root wheel 102 Jun 27 20:13 .Spotlight-V100
d-wx-wx-wt 3 root wheel 102 Jun 28 23:30 .Trashes
-rw-r--r-- 1 root wheel 0 Jun 27 20:13 .com.apple.timemachine.supported
drwx------ 4 root wheel 136 Jun 28 23:32 .fseventsd
-rw-r--r-- 1 root wheel 736736 Jun 27 13:36 EFIStudio.zip
drwxrwxr-x 7 root wheel 238 Jun 28 00:49 Extra
drwxr-xr-x 3 root wheel 102 Apr 1 16:17 IOAHCIBlockStorageInjector.kext
drwxrwxr-t 3 root wheel 102 Jun 27 20:22 Library
-rw-r--r-- 1 root wheel 2204417 Jun 27 13:38 OSX86Tools_1.0.150.zip
-rw-r--r-- 1 root wheel 279168 Jun 27 20:23 boot
drwxr-xr-x 4 root wheel 136 Apr 1 16:17 usr

The command "ls -la@" lists all the file and directories and also the extended attributes. We will now delete all these extended attributes (with xattr) and the .DS_Store files with the command "find".
root@MacBook [~/efitemp] > find . -type d -exec xattr -d "com.apple.FinderInfo" {} \; -print
root@MacBook [~/efitemp] > find . -type f -exec xattr -d "com.apple.FinderInfo" {} \; -print
root@MacBook [~/efitemp] > find . -type d -exec xattr -d "com.apple. quarantine" {} \; -print
root@MacBook [~/efitemp] > find . -type f -exec xattr -d "com.apple. quarantine" {} \; -print
root@MacBook [~/efitemp] > find . -name ".DS_Store" -exec rm -f {} \; -print

Now let's set the ownership and permissions of the kernel extensions and build the kernel extensions cache file extensions.mkext.
root@MacBook [~/efitemp] > cd Extra/
root@MacBook [~/efitemp/Extra] > chmod -R 755 Extensions
root@MacBook [~/efitemp/Extra] > chown -R root:wheel Extensions
root@MacBook [~/efitemp/Extra] > kextcache -a i386 -m Extensions.mkext Extensions
root@MacBook [~/efitemp/Extra] > ls -la@
total 112
drwxrwxr-x 6 root wheel 204 Jun 28 23:58 .
drwxrwxr-x 16 root wheel 612 Jun 28 23:45 ..
drwxrwxr-x 6 root wheel 204 Jun 28 23:45 Extensions
-rw-r--r-- 1 root wheel 52374 Jun 28 23:45 Extensions.mkext
drwxrwxr-x 6 root wheel 204 Jun 26 10:52 Themes
root@MacBook [~/efitemp/Extra] > cd
root@MacBook [~] > umount -f efitemp
root@MacBook [~] > rmdir efitemp


That's all. You are done and almost ready for the first boot of your Chameleon-Mac.

10.) [10.5] Install remaining kernel extensions

  1. Insert the EFIBOOT USB-Stick
  2. Open a new Finder window and select the USB-Stick
  3. Make sure a the folder Extra/Extensions exists
  4. If not create a new Folder Extensions under Extra
  5. Copy all downloaded kernel extensions into EFIBOOT/Extra/Extensions
The folder Extension now should contain:
  1. AppleDecrypt.kext
  2. Disabler.kext
  3. OpenHaltRestart.kext
  4. RealtekR1000.kext
Copy also the EFIStudio.zip to the root of your USB-Stick. You will need it after first boot with Chameleon.

9.) [10.5] Install Chameleon

Now I will guide you through the Chameleon installation process onto your USB-Stick.
  1. Insert the prepared USB-Stick
  2. Start the downloaded Chameleon-2.0-rc431.pkg (double click it)
The Installer will welcome you...


Continue until Installation Type and click on "Change Install Location"...


Select the EFIBOOT USB-Stick...


Click "Continue"...


Click on "Customize"...


Deselect all but "Themes" and click "Install". The installer will ask you for the Administrator password. Provide it and follow until the end. That's all.

8.) [10.5] Prepare the USB-Stick

Put your USB-Stick in any MAC you have and start Disk Utility (Application -> Utilities -> Disk Utility).
  1. Start Diskutil
  2. Select the USB-Stick itself as show in the foto (do not select a partition on the stick).
  3. Select Partition
  4. Under Volume Scheme select 1 Partition
  5. Click "Options" and in the Options sheet select "GUID Partition Scheme"
  6. Choose a Name without spaces (I used EFIBOOT)
  7. Click "Apply"
  8. DONE (it should look like in the foto)

7.) [10.5] Preparations

First of all you need a working installation of Mac OS X 10.5.7.

For the first steps do not use your working installation from your EFI-Mac. Something could go wrong and you could loose all your data.

Make a clean and fresh installation from scratch on a separate hardisk. I made it this way. You can also try a new installation a timemachine backup (Mac OS X DVD Installer -> Menu).

Download the following stuff:
Find a USB-Stick. 128MB should be enough. Mine has 512MB. It's a Kingston DataTraveler.

6.) [10.5] My Hardware Setup

I'm using this hardware:

  • Motherbord: Gigabyte GA-EP45-DS3 (BIOS F9)
  • CPU: Intel Q6600 @ 2,4 GHz
  • GFX: Asus Geforce 7300 GT 256MB passiv
  • MEM: 4GB OCZ PC1066 @ 1066 / 2,1V
  • HDD: Western Digital 640GB WD6400AAKS
  • DVD: LGGH22NS30

This translates into the following hardware:
  • Intel ICH10 Soutbridge (10.5.7 native support)
  • Realtek ALC889A sound chip (disabled in BIOS)
  • 2x Realtek 8111C Gigabit Ethernet
  • T.I. TSB43AB23 Firewire (native support)
  • JMicron 368 IDE (disabled in BIOS)
  • nVidia 7300GT 256MB

5.) Alternative EFI-X™ related forum

Looking for an alternative to the official EFI-X™ support forum? ... ok, then have look at this one:

4.) Chameleon 2.0 Bootloader


This is a really great piece of software. It works like a charm, it looks nice, you can customize it and it is OpenSource...

Further Information, the binary installer and even the source-code is available at the Chameleon Homepage.

3.) How it work's

My solution is based on Chameleon Bootloader. Really a great piece of software!

After having installed and setup your USB-Stick, you can use it like the original EFI-X™.

And the best thing of all is the very limited HCL (Hardware compatibility list) of EFI-X™. All EFI-X™ users share a very common hardware. So very little adoptions / modifications should be necessary. Mainly sound and graphic related.

2.) This is my Alternative

Here it is... it works like the original one. Until now found no issues so far.
  • Vanilla / Native OS X support (e.g. untouched Mac OS X System partion).
  • Full resolution, dual monitor, QE/QI support nVidia graphics
  • Fully working onboard ethernet with Bonjour and full GBit-Speed (80-90 MBytes/sec)
  • Onboard Sound is disabled because I own a USB-soundsystem from Teufel
  • Apple Software Update (tested with offline 10.5.7 Comboupdate)
  • working sleep/wakeup/restart/shutdown

Almost all the software on this stick is open-source. Especially the Ethernet driver. I'm a software engineer. If I will encounter an issue again I can fix it by myself and I do not depend any longer on the non existing support by anyone.

I will replace the Kingston USB-Stick by a smaller one with more speed. Like this one from DeLOCK or an internal solution.


1.) Let's start...

Article removed due to legal reasons. Sorry.